Lately I’ve been spinning up more Linux VM’s (mostly Debian/Ubuntu) in my VMWare ESXI home lab. While it’s simple enough to launch a new VM, I found it tedious to configure certain settings after launch. Most of these were the same for each VM – update/install packages, configure SSH, create directories, open firewall ports, etc. The obvious answer to this is to write a bash script and be done with it – which I did. But without SSH first being enabled, I wasn’t sure how to get that bash script on the guest OS without manually creating it using the VMWare guest console and typing in the script contents. Enter PowerCLI.
PowerCLI is a PowerShell module for managing VM’s in a VMWare vSphere or ESXI environment. It’s chocked full of commands that will make your life much easier if you are managing more than a handful of VM’s. You can install it by running “Install-Module VMware.PowerCLI” in an administrative PowerShell console. The two commands I used to accomplish my goal here were “Copy-VMGuestFile” and “Invoke-VMScript”. The first one I used to copy my bash script from my local computer (a Windows 10 machine) to the VM guest OS filesystem (Ubuntu Linux). I then used “Invoke-VMScript” to execute that script on the guest OS. Throw this and some supporting variables into a PowerShell script, and you’re a double-click away from performing base-configuration on your new VM. Here’s my PowerShell code on GitHub so you can see exactly what I did.
Below is the bash script I copied over to the VM. You could put anything you want in here, but just for reference:
Now, this is a pretty simple script, and there’s probably a lot more I could and should do to improve error-checking and make this modular for different VM configurations or for running on different guest OS’s. There may be other ways of accomplishing this as well, but hopefully this will give you what you need to tailor this solution to your requirements. Happy scripting!
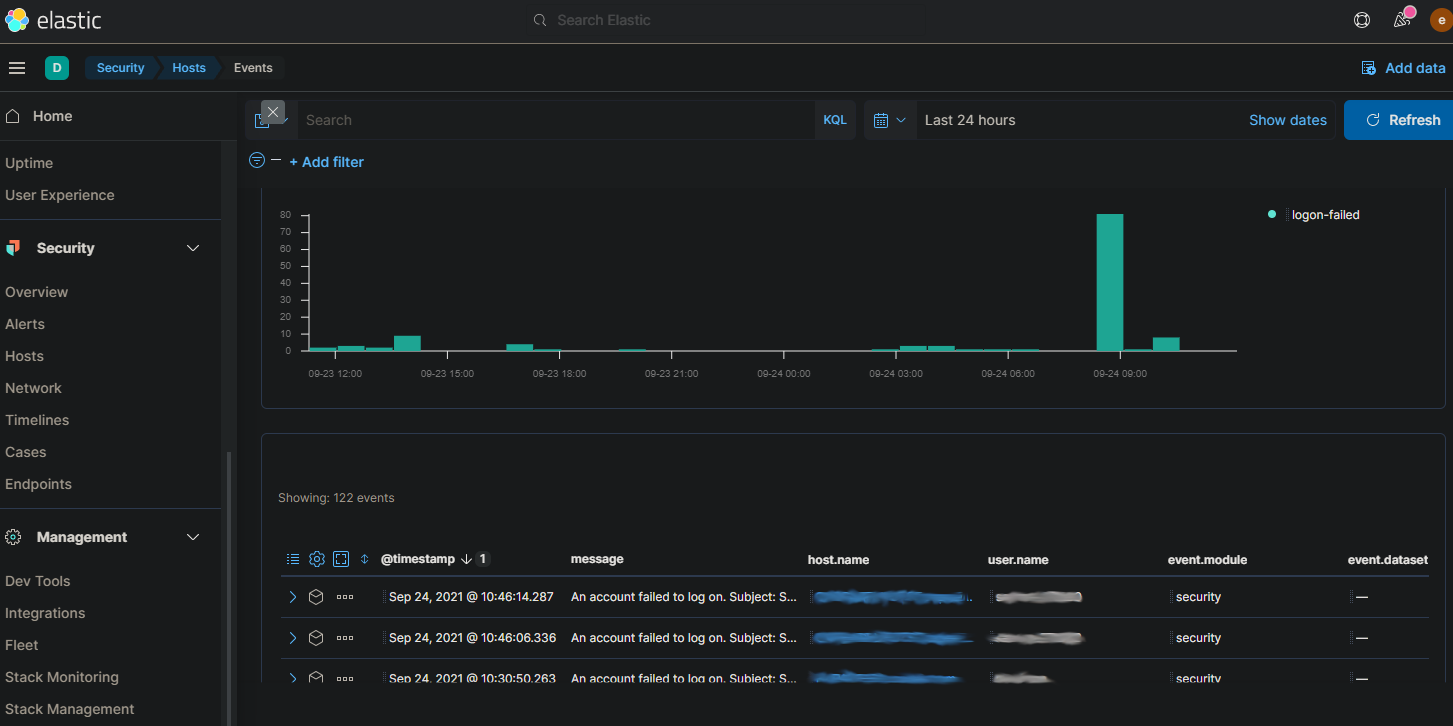
After months of wanting to do this, I’ve finally had the chance to tackle log collection in our organization. While the initial goal was simply offloading security logs from company servers to a centralized collector, I’ve been able to configure a basic implementation of Elasticsearch and Kibana on top of Windows Event Forwarding for visualization. This should give our organization better insight into potentially malicious activity using Kibana’s front-end visualization vs just scrolling through logs in Windows Event Viewer.
The way I set this is up pretty simple. I created a Server 2019 Core (headless) VM configured as a Windows Event Collector, and configured forwarding servers via Group Policy to send specific events (based on event ID) to the collector server. I then installed ElasticSearch, Kibana, and WinLogBeat on the collector server and set it to forward everything in the “Forwarded Events” log to ElasticSearch. In an ideal scenario, we would have load-balanced Kibana and ElasticSearch between a couple of servers or via Kubernetes, but for now this isn’t mission-critical service so we decided to keep a small footprint.
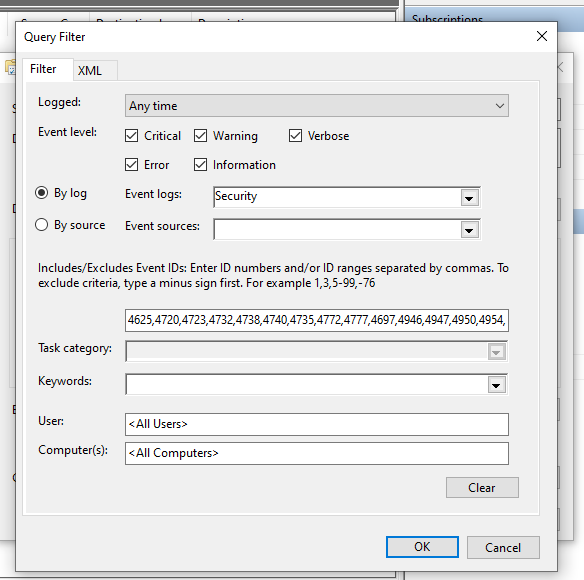
I started this project by configuring Windows Event Forwarding. There’s two ways of doing this – either source-initiated or collector-initiated. While collector-initiated might sound like the simplest way to do it, this method only lets you specify the individual computer objects you want to collect from – you can’t specify by security group. With a source-initiated setup, you CAN specify a security group (of computer objects) which will make management much easier when you add new servers. So to create the subscription, log into the server, open the Windows Event Viewer MMC, and select the “Subscriptions” item in the nav pane on the left. Windows should prompt you to turn on the Windows Event Collection service at this time (make sure to click ok to enable that). Create a new subscription, select “Source-Initiated”, and then select the group (with computer objects in it) that you want to collect events from. Finally, select the events you want forwarded and click ok to create the subscription.
Note that if your collector is a Windows Server Core computer like mine, it won’t have MMC built in. I had to create the subscription on my local computer, export it to an XML file via wecutil, remove the first line of the XML output, and then import it on the Core server using wecutil create-subscription. You can learn more about the wecutil commandlet here.
The next step is to configure the forwarding computers. If you have more than a couple of computers you want to forward from, Group Policy is the way to do it. I followed this excellent guide from AdamTheAutomator to set this up. Once complete, you should start seeing events populate in the “Forwarded Events” log on the collector server. If not, try reducing the number of events specified in the comma-separated list of event-id’s to collect. If you specify a lot of different event id’s in the “Events to collect” field, it can actually break the forwarding (it took me a while to figure this out).
You might have to reduce the number of different events into multiple subscriptions if you have a lot.
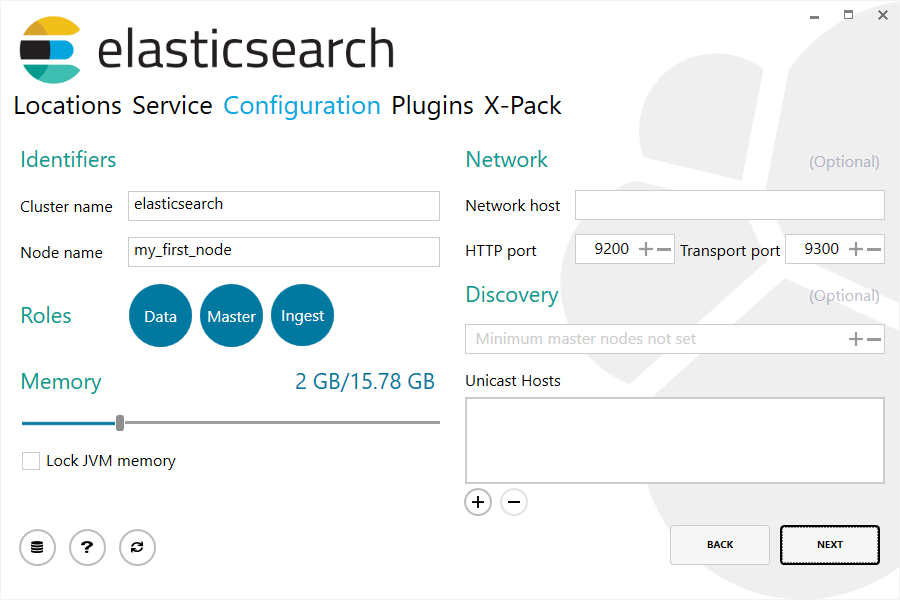
Once I got events forwarding from member servers, I installed Elasticsearch, Kibana, and Winlogbeat on the collector. If you’re installing Elasticsearch on a Windows server like me, you can use the MSI installer provided by Elastic for a quick, clean, and easy installation. Download and launch the MSI, click next a few times, and voila – everything is installed under Program Files and Program Data. There is a step in the installation wizard which allows you to change the default memory allocation of the Java Virtual Machine, http port, and other parameters if you choose.
With Elasticsearch installed, I then installed Kibana. I used the traditional method of extracting the provided zip archive and configuring settings via the Kibana.yml configuration file. While there are many settings you can configure in this file, I only had to change a few to get up and running. First, I had to change the “server.host” line to the IP address of the server. There are also three lines to modify to enable SSL (https) for the Kibana http server client connection which enable SSL and specify the path to the SSL certificate and private key. You’ll obviously need the corresponding SSL certificate (.crt) and .key file (unencrypted) placed on the server in the directory specified. After making these modifications to the Kibana config file, I also had to make add a TCP ALLOW rule to the firewall for port 5601 (the default Kibana http port). With these steps completed, you should be able to navigate to https://[server_ip_or_hostname]:5601 and reach the Kibana web console.
At this point, you have your member servers sending Windows Events to the collector server, Elasticsearch is listening on port 9200, and Kibana is up and running, ready to show your events. However, we still need to install Winlogbeat on the collector server so that it can take the events in the Forwarded Events log and provide them in a format which Elasticsearch can ingest. To do so, download the Winlogbeat.exe file from Elastic and install it on the collector. Once complete, you should be able to add the log collector server as a Windows Event Forwarding source in Kibana. Note that the default configuration for Winlogbeat is to send events from all five of the major event logs (Application, Security, Forwarded, etc). If you only want Winlogbeat to send events in the Forwarded Events log (forwarded from other servers) to Elasticsearch, you’ll need to remove the entries for the other logs in the Winlogbeat.yml config file.
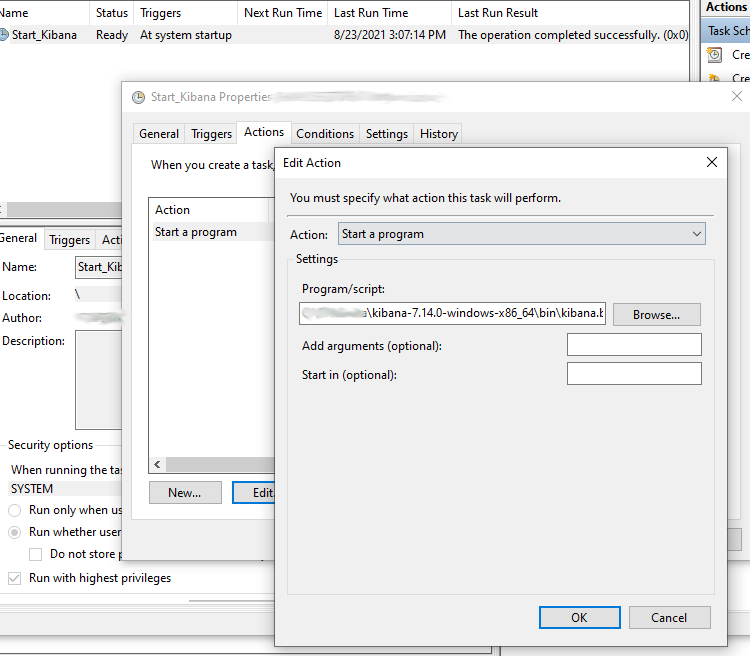
Another important step I did for this was to create a scheduled task to launch Kibana on startup. By now, you’ve seen that the Kibana server starts by executing the Kibana.bat file and runs in the foreground in your terminal window. I simply configured a scheduled task to run that batch file on startup under the local “System” account. Elasticsearch runs as a Windows service so it should automatically start when the system starts.
Scheduled task, run as SYSTEM, to launch kibana.bat at system startup.
The final step is to configure the x-pack security features for Elasticsearch. In order to secure the Kibana console with a username and password, as well as configure SSL communication between nodes if you have multiple nodes, you’ll need to follow the Set up minimal security for Elasticsearch and Set up basic security for the Elastic Stack documentation pages from Elastic. It might look complex at first, but these pages outline each step clearly, and you should be able to configure these settings relatively quickly. At a high level, the steps are as follows:
Run a couple of included scripts to generate random passwords for the built-in service accounts (save these!) and add those passwords to the secure vault.
Create a Certificate Authority on one of your nodes (or your only node) and generate some certs.
Copy the node certs to each (or only) node.
Add some lines to the Elastic.yml config file to enable SSL transport, client authentication, etc.
When you’re done, you should be able to navigate to your Kibana URL, sign in with the “elastic” user, and see your incoming Event Log Events under “Security” > “Hosts”. You can also create additional user accounts within “Management” > “Stack Management”.
Note that this is a bare minimum installation of Elasticsearch. There are a ton of additional features you can configure including SAML authentication, Alerts, Endpoint Protection, etc. However, I hope this helps someone at least get started with sucking in forwarded Windows Events to Elasticsearch and putting a basic front end on all of those alerts. I plan to do another post on some of these additional features in the future – stay tuned.
My fellow Systems Administrator and I are writing more and more automation in PowerShell recently and have finally gotten around to implementing a git repository to store our code. We wanted to keep our code on premise rather than using a cloud-hosted service like GitHub, so we decided to setup an Azure DevOps server locally. Microsoft offers Azure DevOps Express which is free for teams of up to 5 users – perfect for our Sys-Admin duo plus our two developers. While I’m not going to cover how to install the server in this post, I am going to show you how our team uses this awesome software to deploy PowerShell jobs to our automation server (also on premise). This is still a new way of doing things for us and I’ve really only scratched the surface of what you can do with this platform, but hopefully this will provide some insight into how to get started using Azure DevOps in your environment.
Our “applications” are really just PowerShell scripts which we run on an automation server. We’ve traditionally just copied our scripts to a directory on this server, and then create scheduled tasks to run each script based on some trigger (i.e. an event ID). Using Azure DevOps along with git version control fulfills a few needs for our Sys Admin team:
Gives us a central repository for our code so that we can reference and modify each others scripts
Provides communication mechanisms to quickly request, record, and approve changes to our scripts
Provides an efficient, consistent way to deploy code to production and role back if necesary
Creating a new project in Azure DevOps is pretty much self-explanatory – you simply click “New Project” and give it a name. If you have a project on your local file store that you’d like to copy up to that project on DevOps, you can either upload the files directly via the web interface, or clone the empty project locally and then move those files into the newly created local repository folder and “git push” up to DevOps. I use Visual Studio Code as my local code editing application which integrates really nicely with git.
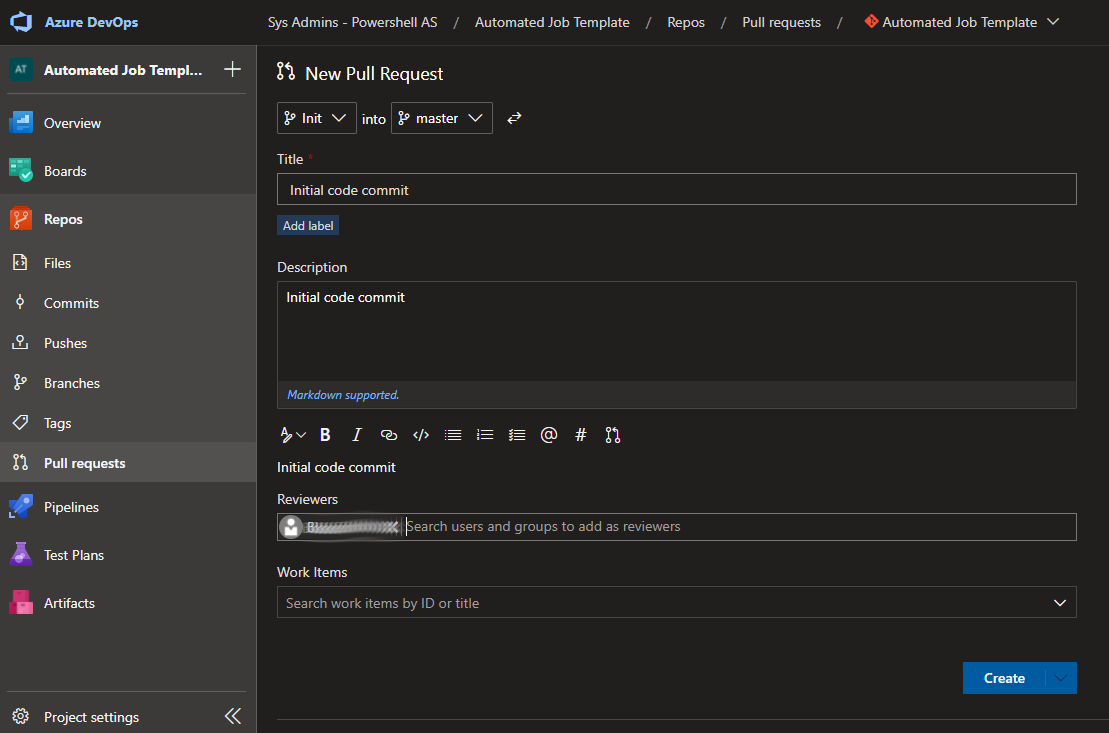
If you’re working in a team, you’ll likely want to use the pull requests feature. When you’re ready to merge your branch to master, just navigate over to “Repos” > “Pull requests” and create a new request. If you enter one or more team members in the “Reviewers” field they’ll receive an email with a notification to approve.
Creating a pull request
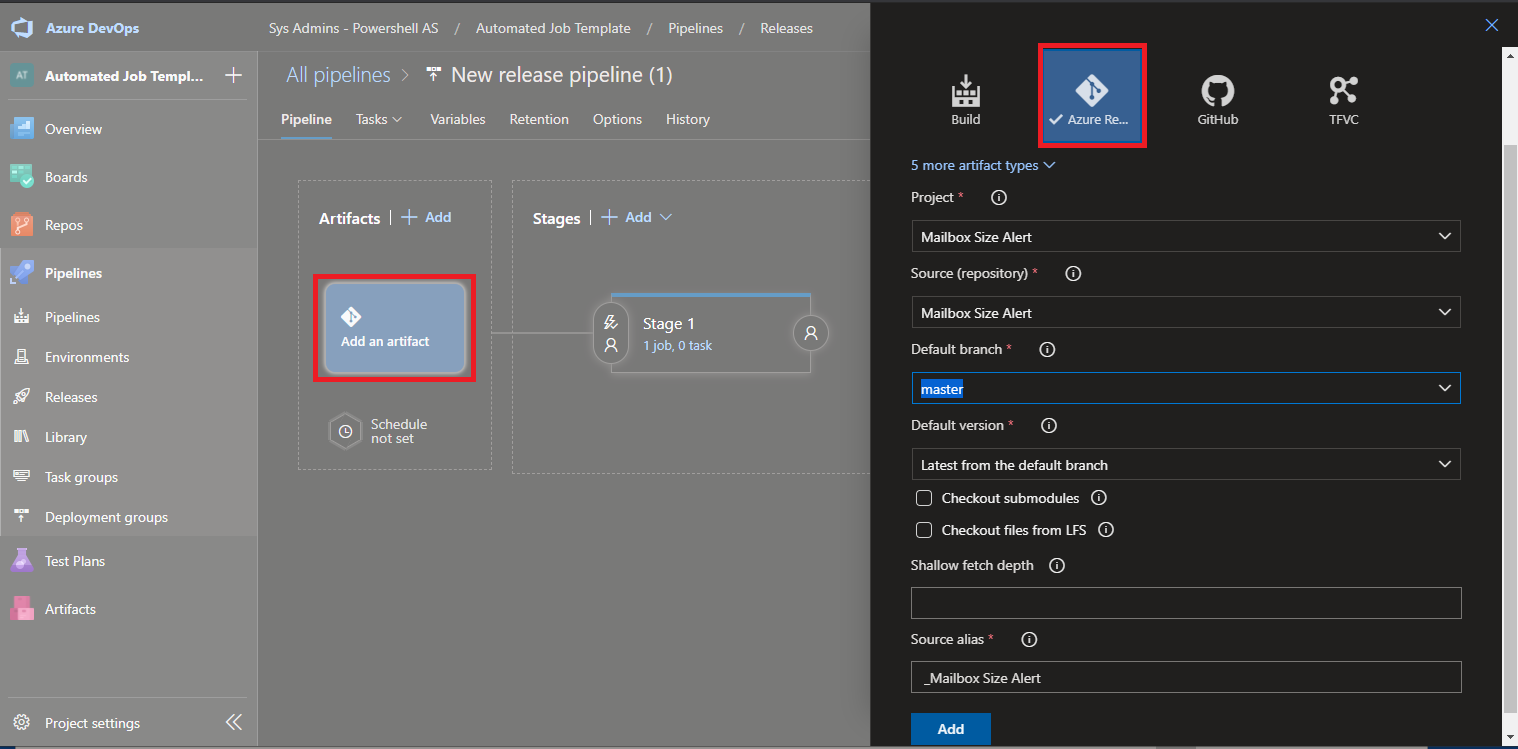
Once your code is ready to deploy, you can take advantage of the Pipelines and Releases features in DevOps. You can create deployment pipelines that are very complex with a lot of automatic building and testing steps, but for this post, I’ll outline the very basic deployment/release scenario that we use to push our PowerShell apps to our production automation server. Azure DevOps requires two main components in a release pipeline – an “Artifact” and one or more “Stages”. An artifact in this case is just the contents (source code) of the project. After creating a new empty release pipeline, click “Add an artifact” and select “Azure Repo”, then specify the project to use as the artifact.
Selecting the artifact
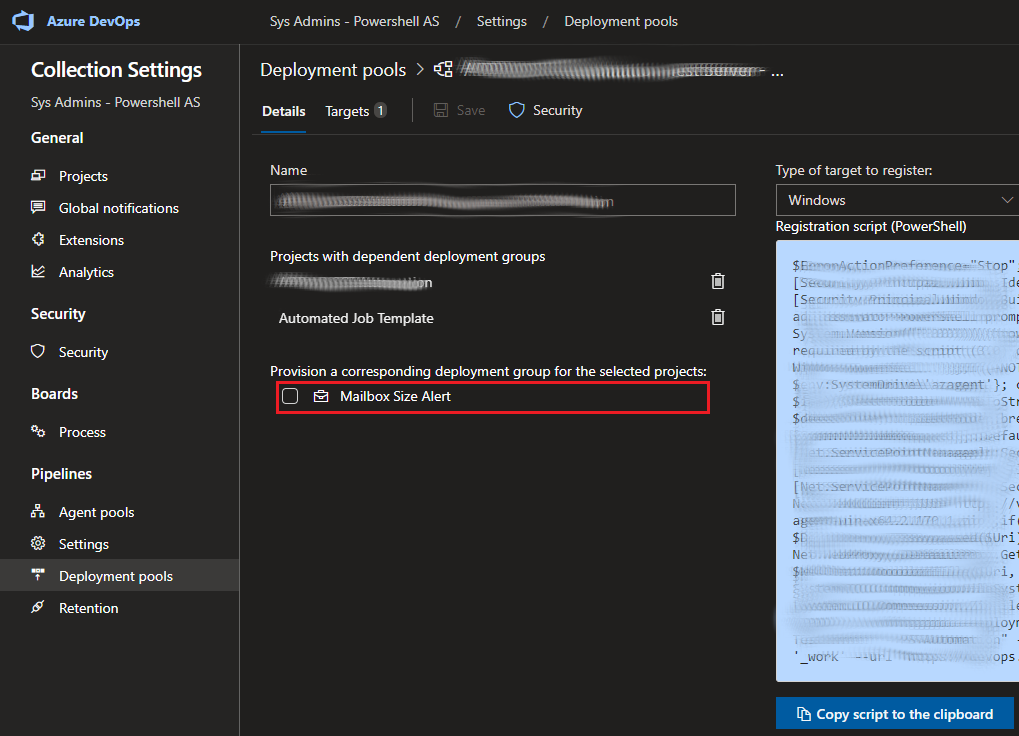
Once you’ve specified an artifact, you can start adding jobs and tasks to the first stage of the release pipeline. The default job in the default stage should be an “agent job”. There are three types of jobs in Azure DevOps – agent jobs, deployment group jobs, and agentless jobs. In our environment, we configured a deployment group containing just the production automation server. Both the agent and deployment group jobs involve running the job on one or more servers with an Azure DevOps agent application installed on them. To install the agent on a server and add it to a deployment pool, navigate to Collection Settings > Deployment pools and add a new deployment pool. The deployment pool details page will provide you with a registration script in either PowerShell or Bash (depending on the OS). To register the server with the deployment pool, you just need to run the script on the server. Finally, navigate back to the details page of the deployment pool on DevOps and check the box next to your project to associate the project with the deployment pool.
Make sure to add your project to the deployment pool!
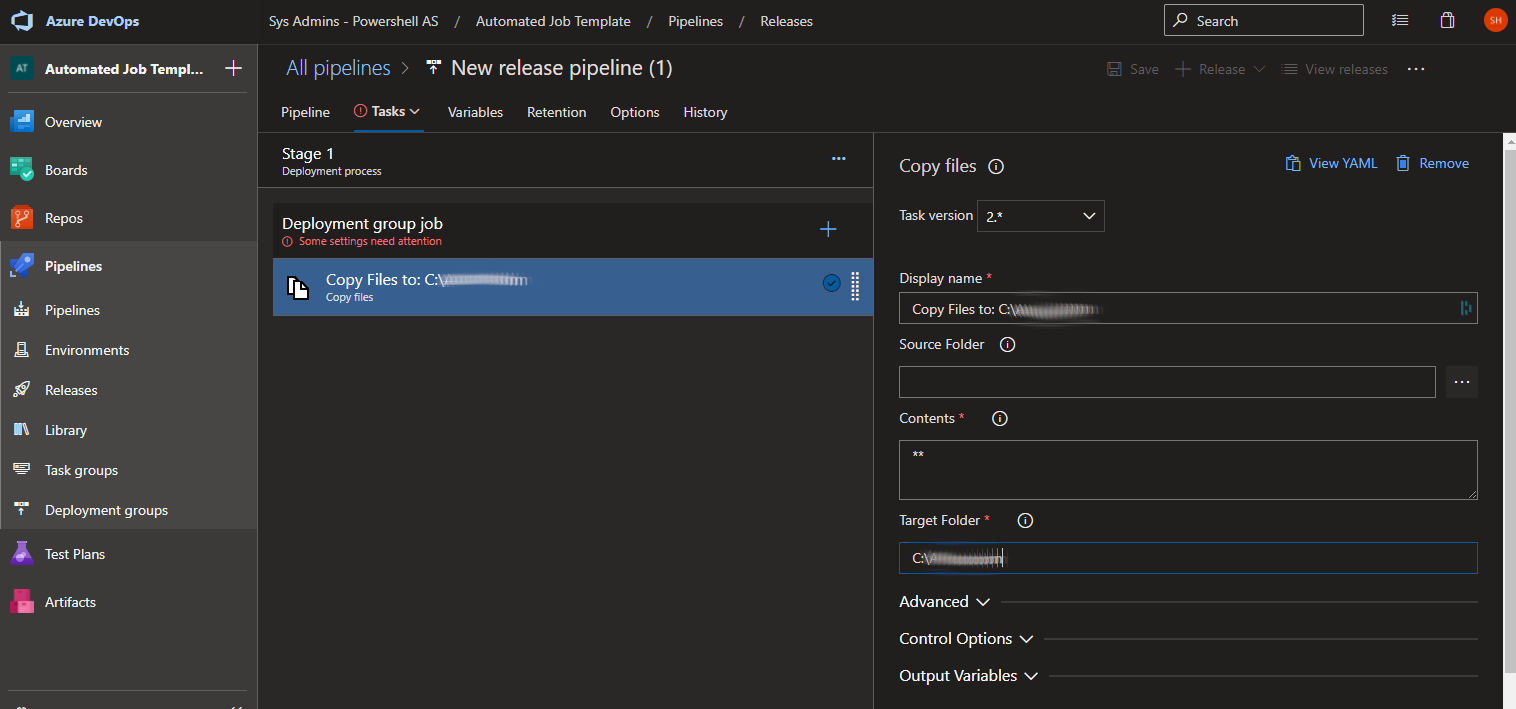
With our deployment pool created, we can head back to our project’s release pipeline and replace the default agent job with a deployment group job specifying the new pool. Within this job, you can add one or more tasks. Azure DevOps has dozens of predefined task templates for performing all kinds of deployment automation. To push the code to our automation server, we use the basic “Copy files” task to copy the files from the project to the server. All you really need to specify in the task configuration is the Target Folder.
Set the target folder in the copy files task
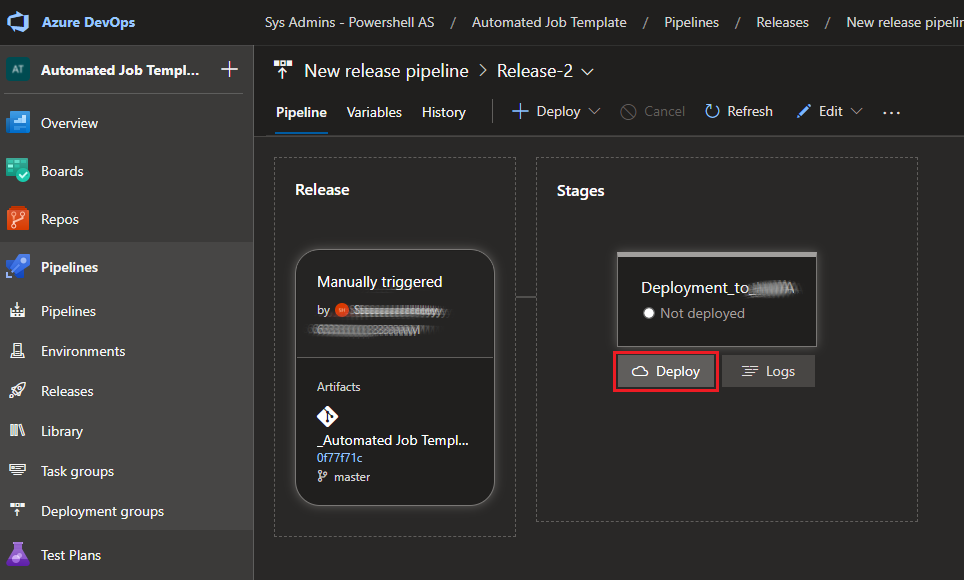
Now that the release pipeline is ready, we can deploy our first release. It’s as simple as clicking “Create release” and then “Deploy”. If all is configured correctly, it should create a directory in the specified target folder on your server containing the project files. This concludes our very basic deployment scenario – you’ll repeat the previous steps to deploy changes. If you need to quickly roll back a deployment, you can simply redeploy the previous release.
Send it!
There is obviously a LOT more you can do with Azure DevOps, but hopefully this will get you started if you are still new to the platform or git version control systems in general. The next step for us will be to incorporate some automated testing – maybe to halt the deployment if there are any errors thrown after executing the script. I’ll be sure to post again when we get there!
The apartment I live in is more or less detached from the main house, and the hot and cold water pipes run from the basement, beneath the hallway, and then up along the side of the garage into the bathroom which is directly above the garage. In the winter, these pipes can freeze on a really cold night. They actually have frozen a couple times over the last few years, so I’m very, very lucky they haven’t burst yet. (Contrary to what you’re probably thinking, this is actually a very nice apartment in a newer house).
The Solution
To prevent this from happening, I’ve had to keep an eye on the weather forecast and shut the water off to my apartment for the few days that the temperature gets below 20-25 degrees Fahrenheit. I’m ok with this solution, except when I go to bed at night and forget to check the temperature (and consequently wake up with frozen pipes and hope they aren’t burst). To hopefully prevent this from ever happening, I came up with a simple solution to run an AWS Lambda function on a schedule which queries the OpenWeatherMap API for the next days low temperature. The Lambda function then sends me a text message notification via SNS if it is forecast to dip below 26 degrees. Here’s how I did it:
1. The CloudWatch Event
Configuring the scheduled event in CloudWatch is relatively straightforward. Within CloudWatch, navigate to “Events” > “Rules” and create a rule. You have the option to trigger the event based on an event pattern or on a schedule. I chose to schedule my event so that it runs at 7:00am and 7:00pm every day during the months of October-April, giving me enough notice to shut the water off before I leave for work in the morning or before I go to bed at night. So in this case, I used Cron.
AWS’s syntax has a couple of small but important differences compared to the standard Linux Cron format. First, there is a sixth (required) value at the end to specify the year(s) it should run. Additionally, if you specify an asterisk (*) for the day-of-month, then the day-of-week value must be a “?”, and vice-versa. So, my cron expression looks like this:
0 0,12 * 11,12,1,2,3,4 ? *
Also note – the time (hour) is specified in GMT. I live in the 5:00 Eastern Time Zone (i.e. Boston area), so 7:00am EST translates to 0:00 GMT. Once you have the Cron expression down, you just select the target. In my case, this was the Lambda function I created earlier.
2. The SNS Topic
Creating an SNS topic and subscription is pretty simple – just create a topic and specify the email address(es) and/or phone number(s) you want the notification to go to in the subscription. For this project I chose a standard queue and added my mobile number as a subscriber.
When I first configured this, my phone wouldn’t receive the SMS message and I must have spent a couple of hours trying to figure out why. I also subscribed my email address and that worked fine, as well as my other phone number. I then started Googling “SNS failed message delivery over SMS” and I found countless forum threads on Reddit and the like stating that SNS SMS delivery is hit or miss. I ended up figuring out that Google Fi (my cell service carrier) provides an email-to-text feature which finally enabled me to receive the message to my phone as a text. So, if you have a Google Pixel on the Fi network and are not receiving SMS messages via SNS, please save yourself some time and try this. Finally, note that SNS can get expensive quick when sending SMS messages, and there is a $1.00 default monthly service quota (which is about 155 SMS messages).
3. The Lambda Function
Below is my Lambda function code. It’s pretty simple but in summary, the script makes a connection to the API, drills down into the output for the daily low temperature for the current day and the next day, and triggers my SNS topic if either temperature is below the threshold of 26 degrees F.
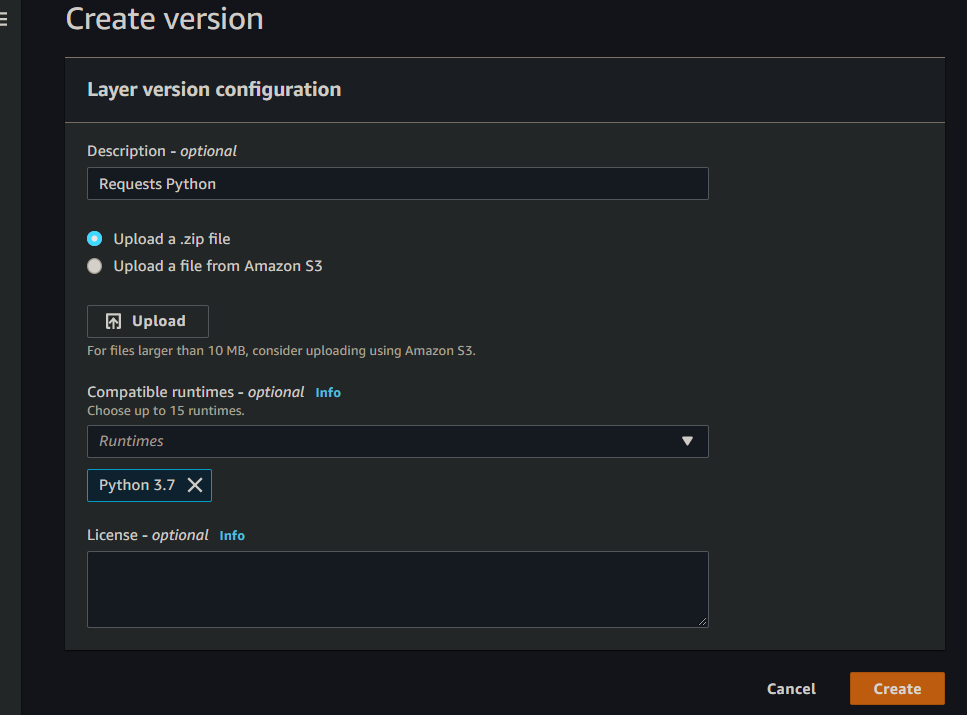
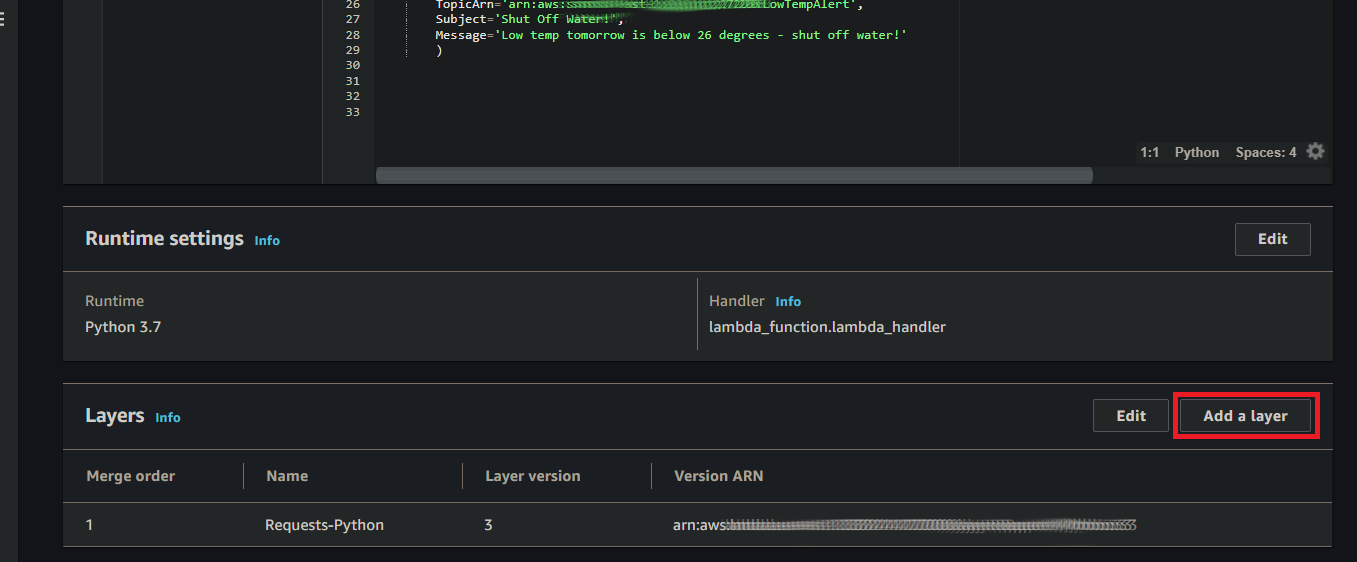
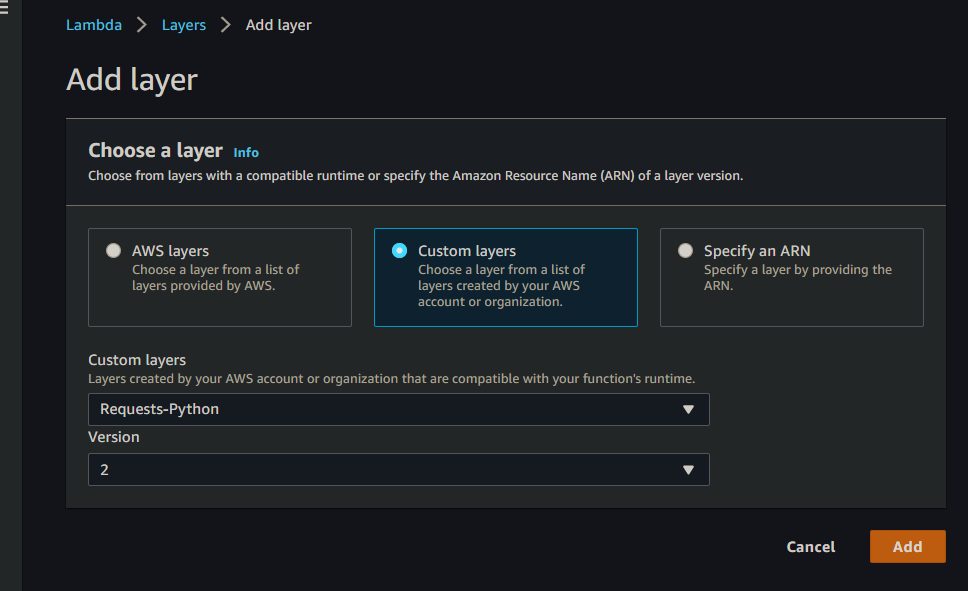
The only real issue I ran into when making this script was importing the “Requests” module. Initially, I received an error stating that the “Requests” module was not found. To correct this, I had to import the module to the Lambda session using the “Layers” functionality in Lambda. Creating the a layer is relatively straightforward, but you need to know the path to the Python libraries directory. In this case, for Python 3.7, the path is “python > lib > python3.7 > site-packages”. So to create the layer, I downloaded the Requests library from pypi.org and zipped it into a “requests_lib.zip” file containing the following directory structure: “python > lib > python3.7 > site-packages > requests” (where the “requests” directory contains the Python files from the previously downloaded “requests” package). Then you just upload it, finish creating the layer, and add the layer in your Lambda function. You should then be able to reference the Requests library (or whichever library you uploaded).
Upload your library and then select the runtime(s) you’re running for your functionAdd the Layer within your Lambda FunctionAdd as a custom layer
Overall this was a pretty simple project but useful nonetheless. I may modify this to check the hourly lows and include when the temperature will drop below the threshold, but it’s definitely doing its job as-is. We’ve had a few nights where the temperature dropped into the low 20’s since I got this working and it’s been reliably alerting me the morning and evening before. Now that spring is officially here, I shouldn’t have to worry about this for 9+ months – but when next winter rolls around I’ll be ready!
This post is a little different from my previous ones. I put a hold on a couple side projects for the last month so I could devote more time to reviewing for this exam. So instead of going longer without posting, I figured I’d do a quick post about my experience with the AWS Certified Solutions Architect Associate certification exam.
To earn this cert, you only need to pass one exam. Basically, you need to know a little bit about a lot of different services provided by the platform. Things like when to use which service, and how to architect resilient, high-performing, and cost-effective applications.
When I started studying formally, I had very little experience with the platform, having only created an S3 bucket and EC2 instance here and there. The main resource I used to prepare was the AWS Certified Solutions Architect Associate – SAA-C02 video-based course from A Cloud Guru. While I wouldn’t say I was impressed with the content itself, it definitely includes the material you need to know for the exam. They recently moved to a paid subscription model (like everything else these days) with higher tiers that provide hands-on cloud sandboxes which is a big improvement over just the videos, but it definitely is pricey. What I did, and what I would recommend, is to purchase access to the course through Udemy. I only paid $20 one-time to have indefinite access to the course videos, excluding the premium material. All-in-all, I would recommend this resource as it undoubtedly helped me pass the exam.
In addition to the video lectures from A Cloud Guru, I purchased the AWS Certified Solutions Architect Associate Training Notes and AWS Certified Solutions Architect Associate Practice Tests from Digital Cloud Training. These are both available from Amazon.com for $10 each on Kindle. These resources I thought were key to passing. After watching all the A Cloud Guru videos, I reviewed these notes as a final exam-cram for 3-4 weeks before I took the exam. These notes distill all the important information you need to know into as few pages as possible, which is just what I was looking for. The practice tests were extremely helpful as well. The questions in the book are very similar to what you’ll see on the exam, except slightly more challenging (which is good in my opinion). For reference, I was scoring 75-80% on these before sitting for the exam and passed comfortably.
Finally, doing labs is definitely necessary. They don’t have to be super complex, but you should practice things like creating a basic VPC with public and private subnets, EC2 instances, and load balancing; enabling CloudWatch logging, publishing a static website on S3, and playing with RDS and DynamoDB. Fortunately, the A Cloud Guru videos walk you through many of these labs. Any Linux or Networking knowledge or experience you have will also help you a lot.
As for the exam itself, I didn’t think too many of the questions were that difficult. For most of them, your choices are A,B,C, or D and two of them are obviously incorrect. They also heavily focus on server-less architectures and services (DynamoDB, Lambda, SQS, ECS, etc) and when to use them. It is a long exam – they give you 2 hours and 20 minutes to answer 65 questions. I didn’t feel rushed to finish, but my brain was definitely a bit fried by the end.
In the end, AWS is such a massive and ever-changing platform that even having passed the exam and understanding the material, I still feel like I’ve only scratched the surface of what there is to know. Earning this cert doesn’t necessarily prove you can build anything of value with the platform in my opinion, but it does give you the foundational knowledgebase to get you started. I definitely think it was worth getting certified, and I have even more ideas now about what I could build and how I could use the platform to improve existing architectures and applications at work. More posts involving AWS to come!
If you’re reading this, you probably know what you’re looking to do with the API. Specifically, this post references the Workspace One UEM API which you can use to query information about devices in your Workspace One (cloud hosted) environment, as well as programmatically manage those devices. At the moment, I’m using this to create a PowerShell script that will automate tagging of devices based on whether or not the owner of the device is still in my employers Active Directory (i.e. has not been separated). Note that there is a similar API for Workspace One Intelligence that aids in generating reports. Just be aware the process for connecting to that API may be different than what I will outline here, which is specific to the UEM API. Finally, note that I used PowerShell 7.1 for the examples below.
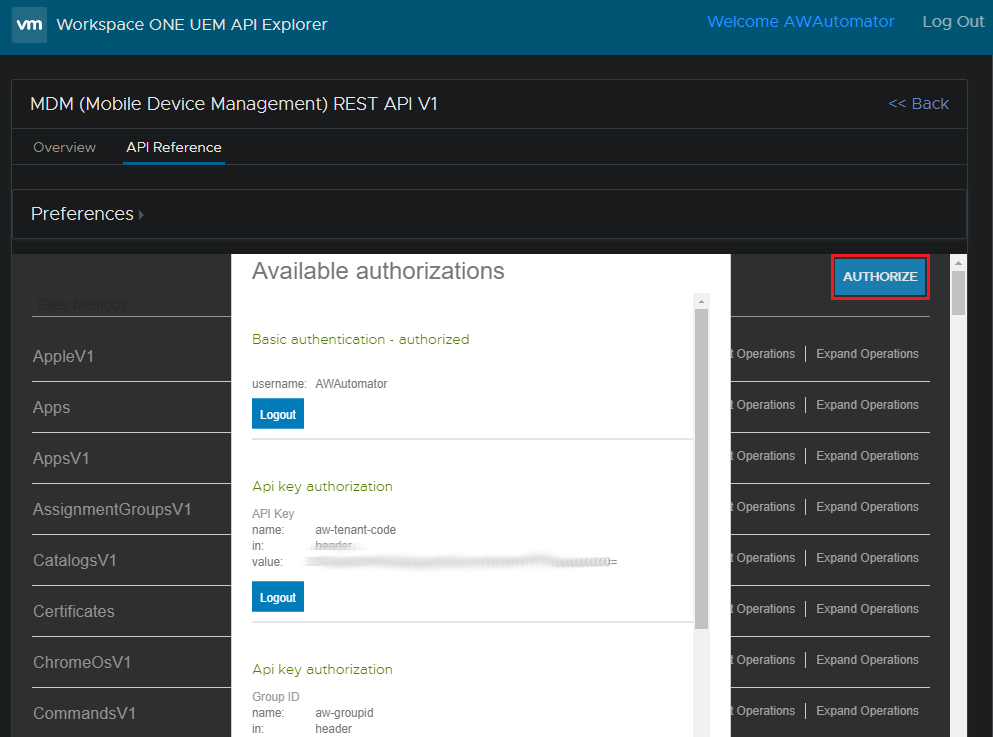
The first thing you want to look at is the API Explorer. You can find it at https://[your_environment_subdomain].awmdm.com/api/help/. If you click the “APIs” tab at the top, it will present you links to the API’s for all the different systems (MDM, MCM, MAM, etc). Here, we’re working with “MDM (Mobile Device Management) REST API V1”. When you click that link and then click the “API Reference” tab at the top, you’ll see all of the available operations and their parameters. The cool thing about this is it’s an interactive reference – once you authenticate, you can run all the different operations on your environment via the web page and it will spit out the results as well as the “CURL” command you need to run it locally (or in a script).
Before you can do this however, you’ll need to log in as a Workspace One console Administrator within the API Explorer. To do this you need to perform two prerequisites:
Create a console Administrator with API access in your Workspace One UEM management console
Create a new Service Account with Admin privileges within system settings and confirm API access/authentication is enabled
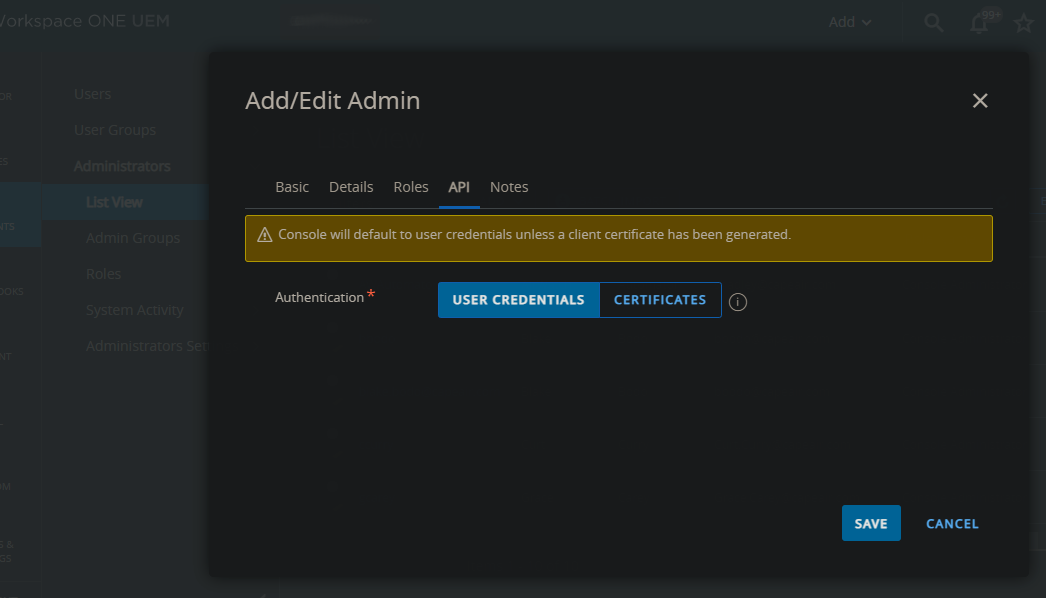
For the console Administrator account, navigate to Accounts > Administrators > List View, and click “Add”. Enter the Username, Password, etc to create the Administrator account.
Also confirm that “Authentication” is set to “User Credentials” under the “API” tab and click “Save”.
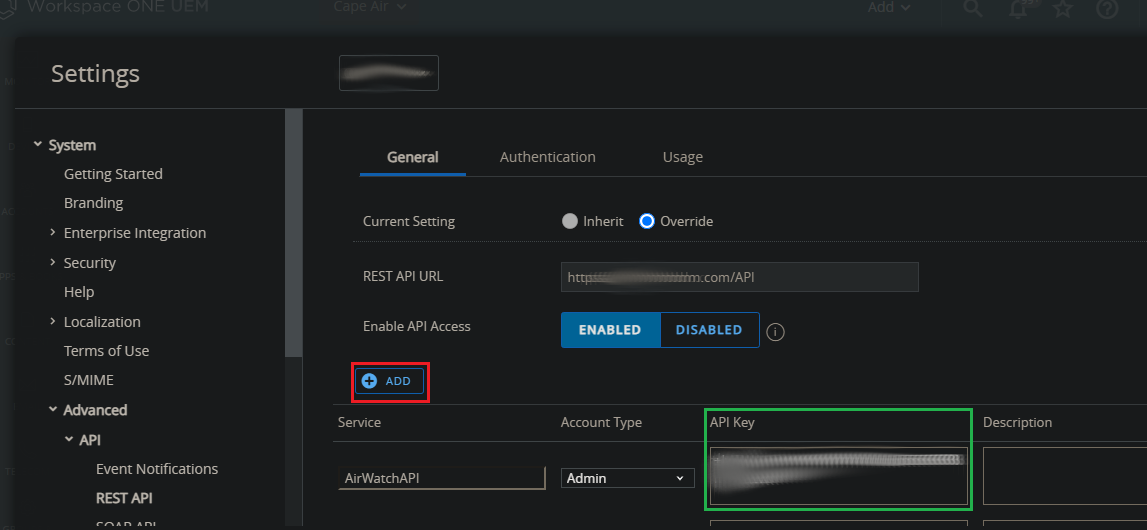
To create the API service account, navigate to General Settings > System Settings > Advanced > API > REST API, and click the “Add” button. Enter the service account name and confirm “Admin” is selected under “Account Type”. The API Key for this account will be listed next to the service account entry in the console (shown with the green box around it in the image below). This API Key is also known as your “aw-tenant-code”.
Now that we have our credentials, we can head back to the API Reference and authenticate. Again, you can navigate to this page at – https://[your_environment_subdomain].awmdm.com/api/help/.
Within the API tab of the “MDM (Mobile Device Management) REST API V1” API page, click the “Authorize” button at the top. This will open an “Available Authorizations” lightbox. Under “Basic authentication”, enter the username and password of the console administrator account you created earlier and click “Login”. After the page reloads, click the “Authorize” button again and enter in the service account API key we just generated under “Api key authorization” and click “Login”.
At this point, you should be able to expand any of the API Operations listed, enter the required parameters, and receive an error-free JSON-formatted response when you click the “Try it!” button. If you use a Mac or Linux computer, you can copy and paste the auto-generated CURL command right into your terminal and receive the same response. However, if you’re like me and need or want to use PowerShell for your scripting, keep reading.
PowerShell doesn’t have a “CURL” GET command, but it does have an “Invoke-WebRequest” command which essentially does the same thing. For a simple GET request the syntax is similar – the only real difference is the way you specify the authentication headers.
To do this in PowerShell, you enter the header values in a hash table. A hash table is basically just an array which stores key-value pairs. So in this case, you specify the user authorization header string and aw-tenant-code. Note that for an actual script that you’d have running as a scheduled task, you’d probably want to pull in a secure string from a credential store somewhere. For simplicity and brevity however, the code below simply prompts the user to enter the user authorization string (shown in the API Explorer-generated CURL command) and aw-tenant-code API Key.
With your authentication headers loaded in, you can simply call the REST URL with the Invoke-WebRequest PowerShell command. The following API call returns a JSON-formatted list of all devices in your AirWatch environment:
Once you have the data you’re looking for, you can load it into a variable and manipulate it as necessary. If you want to POST, you can load your POST values into a hash table like we did for the Authentication values and use the “-method POST” option with the Invoke-RestMethod command.
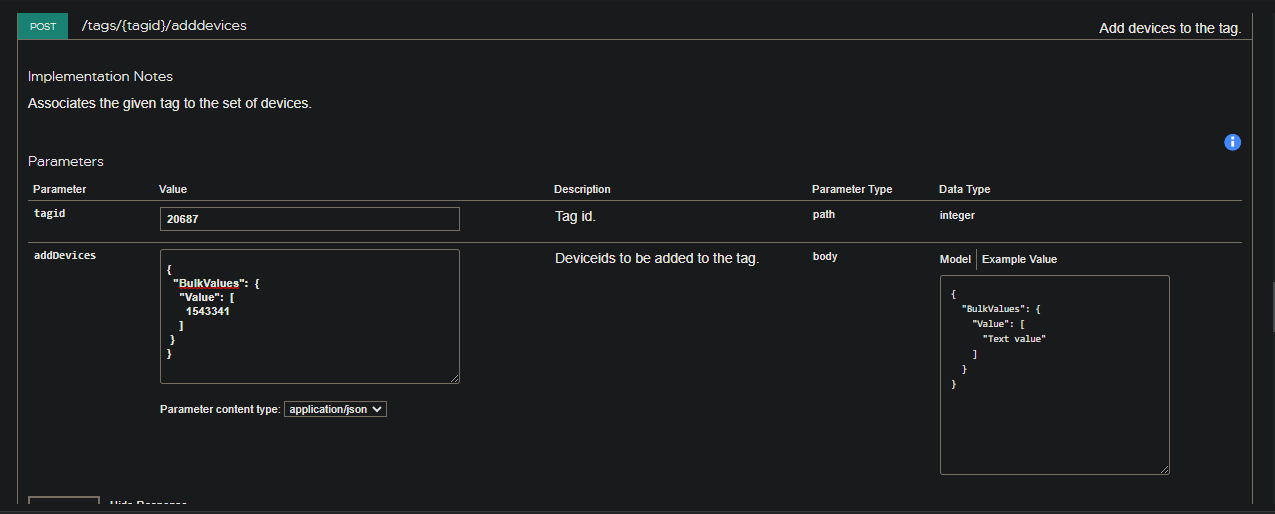
Notice that we use the “-Body” flag and pass the $postParameters variable with the arguments. For this POST call, I found the JSON format needed for the $postParameters variable from the API Reference under the “POST /tags/{tagid}/adddevices” API call (shown below).
At first I tried entering the JSON exactly as outputted in the API Reference for the $postParameters variable, but the Invoke-RestMethod command wouldn’t accept it. You have to format the JSON as shown above with “@{” in place of open curly brackets, “@(” instead of open square brackets, “equals” signs instead of colons, and finally pass it to the “ConvertTo-JSON” PowerShell function. So, the JSON below…
{
  "BulkValues":  {
    "Value":  [
      1543341
    ]
 }
}
Translates to this in PowerShell…
@{
    "BulkValues" = @{
        "Value" = @(1543341)
    }
}
This should be enough to get you started with doing API calls and managing VMWare WorkSpace One via the API. Hopefully you found this helpful in some way – I’ll try to update this post with my entire tag-updating function once it’s complete. Happy scripting!
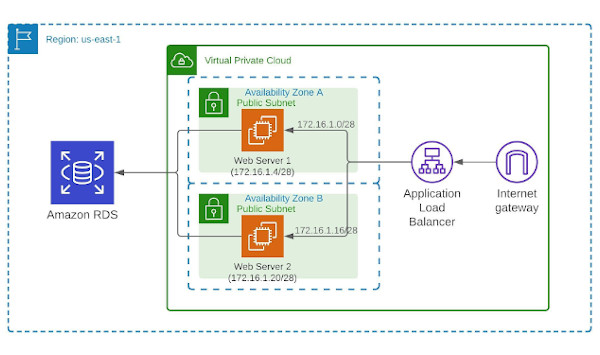
I’ve spun up dozens of WordPress installations over the years for everything from production e-commerce websites to simple test rigs. So far, they’ve all been simple single-server, single-disk installations. I’ve never needed to do any kind of distributed or high-availability configuration previously. While I don’t do a lot of work with web servers at the moment at my day job, I used to do web development for a building materials company with a fairly sizeable e-commerce website. Looking back, it probably would have been worth-while to configure that websites underlying architecture for higher availability than just a simple single-server configuration. With that scenario in mind, I decided to configure a simple multi-server distributed architecture in AWS for a fictitious WordPress test website for my latest project.
For this project, I wanted to have two WordPress web (application) servers in two different Availability Zones with a load-balancer distributing traffic between them. These web servers would contain only the core WordPress files, plugins, and themes – the media files would be hosted in an S3 bucket and the database hosted in RDS in a multi-AZ deployment. Together, this would theoretically improve performance and provide higher availability of the application. Note that there is a lot more you could do to further improve the availability and performance of this website including usage of a CDN (such as CloudFront) and auto-scaling, but I wanted to keep this project’s footprint relatively small and simple for cost reasons.
Here’s a birds-eye view of the steps I performed to complete this project:
Create and configure the VPC for the application including subnets, security groups, Internet Gateway, etc.
Launch and configure the initial EC2 instance (Web01) using the Bitnami WordPress AMI and assign an Elastic IP
Create an RDS database and migrate the initial WordPress database to it from Web01
Create an S3 bucket and IAM user for use with the Media Offload WordPress plugin
Clone Web01 to create the second web server (Web02)
Setup a load balancer and add both web servers as targets
Configure DNS records
Configure rsync on both web servers to synchronize theme and plugin changes on Web01 to Web02
While this may look involved, it really wasn’t that time consuming. Also, I won’t go deep into step 8 in this post as my previous post covers this in detail (which I’ll link to at the end). With that, let’s dive in!
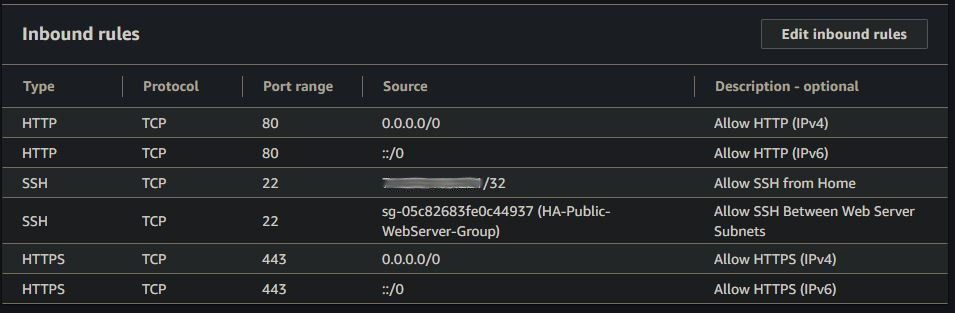
Looking at the VPC diagram at the top of this post, you can see I setup two different subnets for my web servers (one in each). I also added an Internet Gateway with a default route to 0.0.0.0/0, making these subnets public. Each server then has a static, public Elastic IP address assigned to it making them accessible from the internet. Specifically, they are accessible on ports 80 and 443 as shown below in the security group I created for the web servers.
Note that the outbound rules mirror the inbound rules in this security group.
I also have port 22 open (SSH) to the public IP address of my home network for management, and to the web server security group to allow rsync between the two servers (which we’ll look at later).
Next, I launched an EC2 t2.micro instance in subnet A using Bitnami’s WordPress AMI. This AMI is composed of a Debian Linux instance with WordPress installed and the database configured. I then assigned an Elastic IP to this instance and added it to my public web server security group.
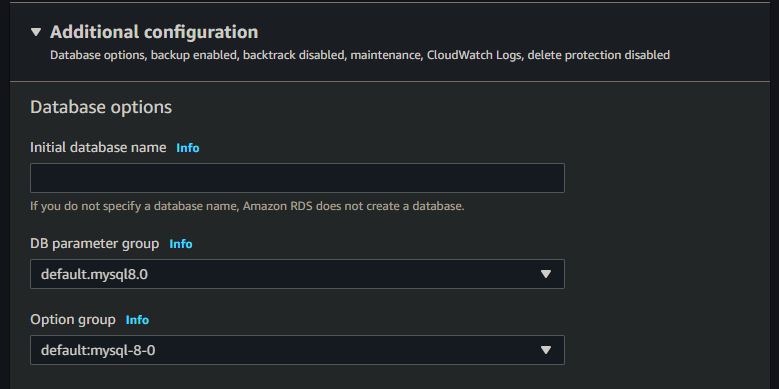
With the initial web server running, the next step was to create a MySQL database in RDS. This process is relatively straightforward, but there are a couple things you should look out for in the database creation wizard. First, if you want the benefits of increased redundancy of your database service, you should select “Multi-AZ” deployment. This will setup a standby RDS instance in another availability zone which is ready to take over should anything happen to the primary instance. Note that this will cost more money. Also, under “Additional Configuration”, be sure to enter an “Initial database name”. If you don’t do this, you won’t actually have an initial database created – you’ll have to SSH into the RDS instance and create the actual database in MySQL.
Make sure to enter the initial database name!
With the RDS database created, I followed this tutorial published by Bitnami to export the database created initially on Web01 to RDS. You’ll also need to modify the wp-config.php file to point to the RDS database as outlined in the tutorial.
At this point, your “Hello World” WordPress website should be functional. I also wanted to store my website media files on S3, and determined that the best option was to use the “WP Offload Media Lite” WordPress plugin to achieve this. Essentially, you create a public S3 bucket and an IAM user with access to that bucket in order to upload and retrieve files from it. You then enter that user’s access keys in the wp-config.php file so that the plugin can access the your bucket as that user. The plugin makers, Delicious Brains Inc, provide excellent documentation that will guide you through the setup details.
With my Web01 golden-server setup how I wanted it, I then went about cloning it to make Web02. To do this, I simply created an image (AMI) of Web01 and launched another EC2 instance in subnet B using that AMI. After assigning an Elastic IP address to the instance and adding it to my web server security group, I had two identical servers that were ready to be put to use behind a load balancer.
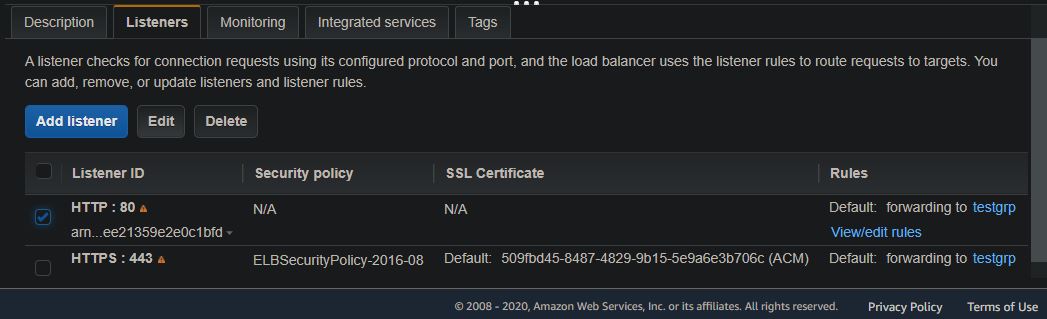
AWS provides three types of load balancers at the time of this writing – Classic, Network, and Application load balancers. As we’re creating a website that will be accessed via HTTP/HTTPS by end users, I used an application load balancer. For the load balancer configuration, I added a listener for port 443 in addition to port 80 and selected the two AZ’s that my web servers reside in to be part of the distribution. You’ll also need to specify an SSL certificate to use if you’re enabling HTTPS. I generated a free SSL certificate in AWS Certificate Manager (which AWS provides a link to in the load balancer configuration wizard). After creating the certificate, AWS provides you with an auto-generated CNAME record which you enter with your domain registrar to verify ownership of the SSL certificate. For example, this is what the CNAME record looks like for my domain name in Google DNS.
With your SSL certificate verified, the next step in the load balancer configuration is to create a Target Group and add your web servers to it. A “Target Group” is simply a group of servers which a load balancer should distribute traffic to. As such, my target group consisted of my two web servers. After creating the target group and adding the web servers, I made sure to check “sticky sessions” under “Attributes” within the console and configure a health check. “Sticky Sessions” essentially tie an end user to a specific web server within the target group for the duration of their session. I just did this for consistency. Additionally, I configured a health check on the “/wp-content” directory. This will check the availability of the website at the application layer (HTTP/S) and alert you if it is not reachable, even if the instance itself is healthy.
At this point, I had a load balancer created, but my traffic was not automatically redirecting to HTTPS if I entered my domain name (i.e. www.example.com) in my web browser without explicitly appending the “https://” to the beginning. To achieve this, I had to do two things. First, I had to create a subdomain forward record in Google DNS for my domain. This record tells browsers to forward “[mydomainname].com” to “https://www.[mydomainname].com”. Additionally, I had to modify the port 80 HTTP listener on my load balancer to redirect to HTTPS. To do this in the AWS console, navigate to EC2 > Load Balancers, select your load balancer, and select the “Listeners” tab. Next, check the box next to your port 80 listener and click the “Edit” button.
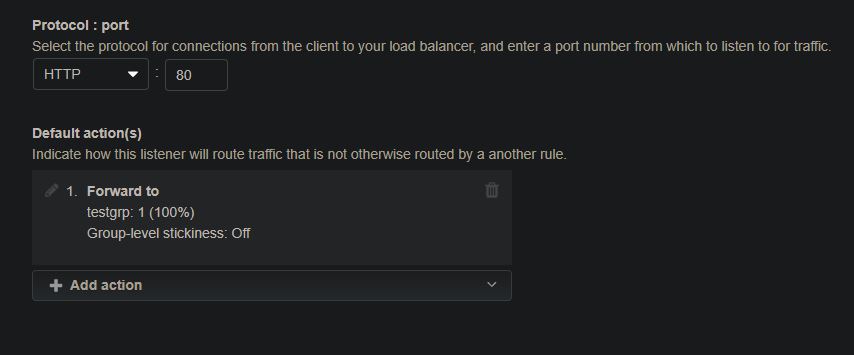
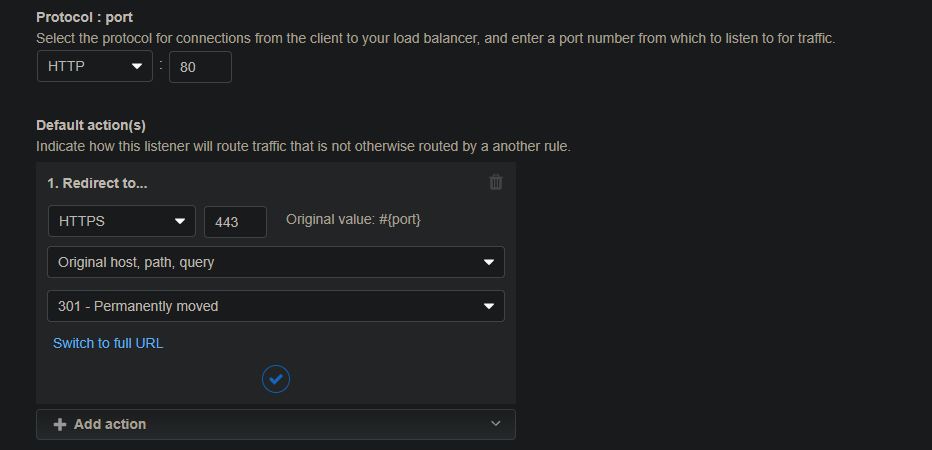
Within the port 80 listener page, I had to remove the default listener action, then create the “redirect” listener action shown below. It took me a while to figure this out but, once I did, all traffic was forced to my website over HTTPS.
Delete the “Forward to” rule listed here.After deleting the “Forward to” rule, add an HTTPS redirect rule as shown here.
With the underlying architecture in place and configured correctly, I could have ended this project here. I shut down one of the servers to confirm that the redundancy was working correctly, which it was. Any new posts or media I added to the site were displaying on both servers (I tested this by simply navigating to the public IP address of each individual server). However, I quickly realized that any theme or plugin updates would not replicate automatically between the two servers as they are not stored in the database or in S3. My previous post, seen here, explains how I solved this problem using rsync. This way, any theme or plugin updates made on my master server (Web01) would automatically replicate over to the secondary server (Web02) after 5 minutes. So far, it’s working pretty well.
This was a really fun project that used several different AWS services. I’m happy with this setup for my needs at the moment, but I know there’s several different things I could do in addition (or instead of) that would make this setup even more robust. I’d like to figure out how to periodically update my AMI so that it has the latest changes and then use it in an autoscaling setup. This way, if I make lots of changes since the original AMI and one of my servers goes down, any new server(s) won’t need to copy all changes over since the beginning – the AMI that launched it would have the latest changes. Once I figure this out I’ll do another post on it – stay tuned!
In a preview of another blog post coming very soon, I’ve decided to do a short post on an architecture dilemma I encountered while configuring a load-balanced WordPress website in AWS – specifically regarding storage. My plan is to have two public EC2 web servers handling incoming web traffic via a load balancer. The database I’ll have running on RDS with a read-replica in another availability zone (AZ). Finally, I will offload my media files to an S3 bucket. I got all of that configured and working, but soon realized it was going to be a pain to update two or more servers manually every time I made a plugin or theme change, so I started searching for better ways to do this.
The most obvious solution, or so I thought, was to migrate the WordPress application files to an EFS (Elastic File System) volume and share it between the two web servers. This is actually AWS’s recommended solution. However, EFS has a latency problem. I started opening article after article on Google search about how people tried migrating to EFS and the site performance degraded to the point of being almost unusable. This is due to the many small PHP files that WordPress needs to load to deliver a page which EFS doesn’t handle well. The recommended solution for this is to use Opcache to cache the content on each server and then disable, or write to the local volume, all logging and write-intensive plugins/functions. I didn’t really like this solution for a few reasons:
Added complexity I don’t feel is necessary for two or three servers.
Increased cost for EFS storage.
If I want to run a plugin like WordFence with a lot of logging, I’ll need to modify the plugin to write somewhere else which might not be simple or best practice
In many of the articles/post I was reading, people stated that even after performance tuning, their websites weren’t super quick using EFS
One solution I came across from A Cloud Guru was creating a master write-node and syncing the WordPress application files from that system to an S3 bucket via a Chron job. The other nodes in the load balancer group would then sync down the changes in the S3 bucket to their volumes every minute or so via a Chron job. This seems like a good solution for my application. For my setup though, I want to exclude S3 and pull the current WordPress application files directly from the master node volume to the read-only node(s) using rsync over SSH. I’ll show you specifically how I did this – just note that I am using a Bitnami WordPress image on AWS, so these steps might need to be different for a different environment.
First, I created an ssh keypair on the master server (Web01) using the following command:
ssh-keygen -f ~/.ssh/wp_sync -q -P ""
This creates a keypair with “wp_sync” and “wp_sync.pub” in the ~/.ssh directory of the current user. According to Bitnami, you also have to modify the /etc/ssh/sshd_config file as well and add the following lines (so I did that):
RSAAuthentication yes
PubkeyAuthentication yes
While still on Web01, I installed rsync (apt-get update, apt-get install rsync).
Next, I copied the private key over to my read-node server (Web02) and dropped it in the same ~/.ssh/ directory on that instance. After installing rsync on Web02 and confirming that the security group for my servers allowed SSH to/from their respective subnets, I was ready to create a connection to the master server (Web01) from Web02. Below is the generic rsync command I am using:
This command establishes the rsync connection over SSH using the private key file from Web01 and then (recursively) syncs the contents of the wp-content directory on Web01 to the same directory on Web02. The “–delete” flag at the end instructs rsync to remove files/directories in the destination directory if they are not in the source directory. To schedule this command to run periodically, I simply included this command in a Crontab entry. I currently have it scheduled to run every 5 minutes.
I plan to publish a more in-depth post soon detailing the architecture for my high-availability WordPress site and how I set it up on AWS, but I thought this was worth its own post. Hopefully this will help someone trying to do something similar – stay tuned for more!
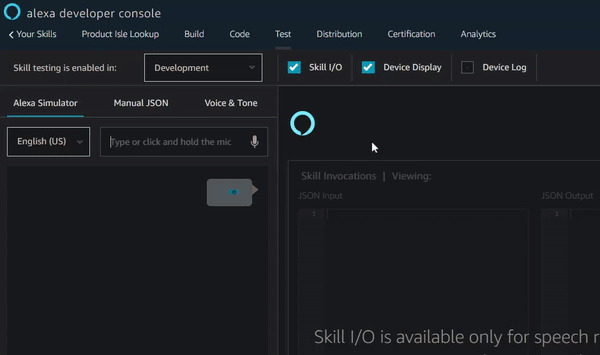
Let me start by saying that I don’t really use Alexa or Echo devices. I do think they’re cool, I just don’t see many practical applications for voice-assistants. One case where I do think a voice assistant could be helpful though is for searching or modifying data in a database using a conversational input. One idea I had to test this was to make a simple product location lookup app for Alexa. Let’s say you’re in a grocery store and you’re looking for a specific product (and you don’t know what isle it’s in). You have a couple of options: A) visually scan all the signs above each isle; B) look up the product in an alphabetically-sorted paper list of products with their corresponding isle at the end of the nearest isle (if available); or C) ask an associate. Imagine if there was an Amazon Echo or Alexa-enabled device where you could ask Alexa where a specific product is, have her look it up in a database and then tell you what isle it was in.
You know what I’m talking about… where’s the marshmallows?!
Now, the grocery store could use a mobile app for this but customers would have to download it. They could also use a tablet-like kiosk (I’ve actually seen these in Target), but those would likely be more expensive and it would take longer to punch in the item you are searching for. Additionally, in recent days with Covid-19, it would be an added bonus if people didn’t have to physically touch a shared device. My real motivation with this project was to get more experience with AWS and Python, but you could see how this could be a potential use-case.
So the architecture for this is pretty simple. I started with a sample skill template from AWS written in Python which I modified to detect the “slot”, or product that the user includes in their verbal search request. It then searches for the slot variable in a pre-constructed DynamoDB table containing all the products and corresponding isles and returns the isle to the user. At a high level, the individual steps I did for this project were as follows:
Create the new skill in the Alexa Developer Console and configure intents, slots, skill name, etc.
Create a table in DynamoDB and enter the data.
Create an IAM role with permission to query DynamoDB and assign it to the skill.
Edit the lambda function code in the Alexa skill to make a connection to the database and return an isle value based on the given product.
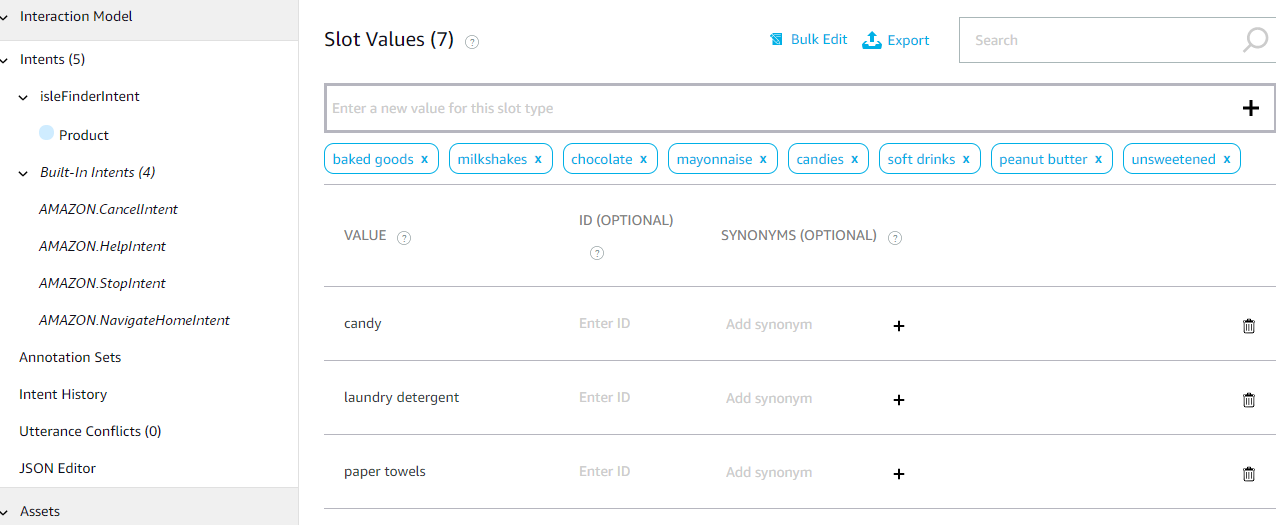
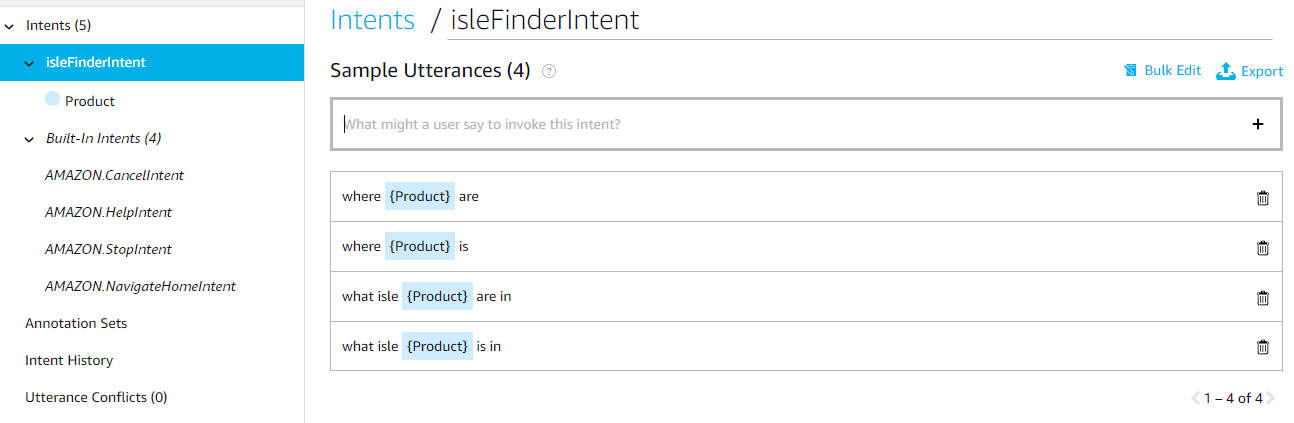
Step one is pretty straight-forward. You start by opening the Alexa Developer Console and creating an invocation name. You then create a “slot”, an “intent”, and define “utterances”. Your sample utterances are phrases or combinations of words that will trigger your skill. You can think of a slot as the variable in your utterance. For example, in my “Isle Finder” skill, I wanted the user to be able to say “Alexa, ask Isle Finder where [product(s)] is/are…” in order to trigger the skill. So under “Slot types” in the Alexa Developer Console menu, I added a slot called “Product” and entered all the possible values for that slot (i.e. bread, milk, honey, etc). For my utterances, I added “where {Product} is” and “where {Product} are”, where “{Product}” references the Product slot I defined previously.
My “Product” slot and some values (the ones at the top are auto-generated from a built in list).Sample utterances to trigger the “isleFinderIntent” intent using the “Product” slot.
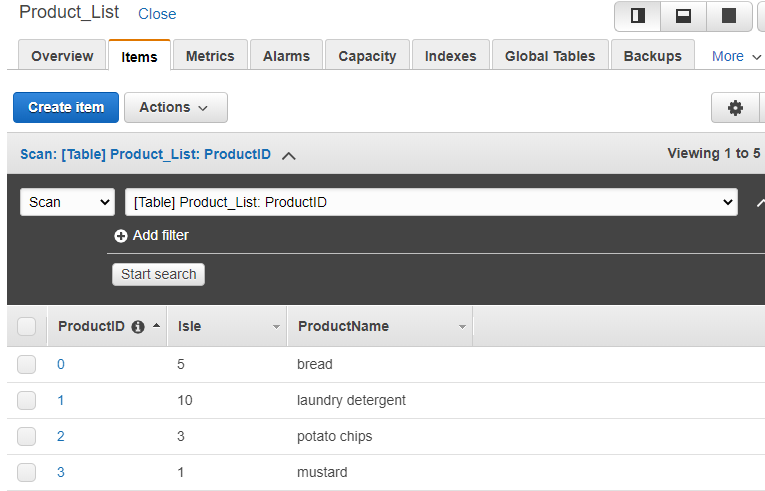
Once that was complete, I moved on to entering product data in DynamoDB. Again, creating the table and entering data is pretty straightforward. One speed-bump I encountered however was querying the database using a value OTHER than the primary key (ProductID). In DynamoDB, you need something called a Global Secondary Index in order to query a table based on an index other than your primary key index. Now, in my table I could have set ProductName as the primary key without compromising on functionality, but in the real world the primary key in a table is usually an ID number or similar.
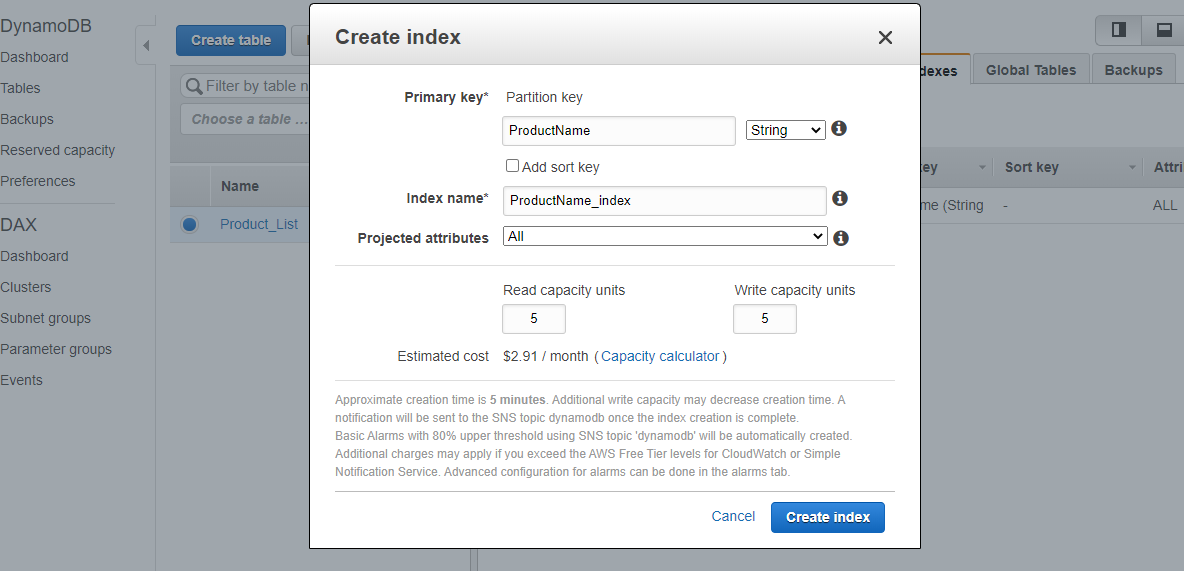
Thankfully, creating and querying a GSI is pretty easy. Inside your DynamoDB table in the AWS console, click the “Indexes” tab, click the “Create Index” button, and then enter in the partition key, index name, and your desired read/write capacity units. The partition key is the name of the key you want to query on. In my case I used “ProductName”. The index name is just that – just come up with an index name for the GSI (i.e “ProductNameindex”). For the capacity units, I changed these to 1 for both read and write to reduce cost (and because that’s all I need). This is the amount of read or write activity the table can support measured in strongly-consistent reads per second. You can read more about this here. Luckily, AWS offers 25 provisioned read-capacity units and 25 write-capacity units free forever, so I didn’t incur any additional charges.
My “Product_List” DynamoDB table.Global Secondary Index configuration.
The Code…
With all of our supporting pieces in hand, let’s take a look at how to put them together with the code in our Lambda function. There’s a few steps we need to do in order for this to work at a basic level:
Change our intent name in the “HelloWorldIntentHandler” function.
Import a few dependencies.
Get the “slot” (“Product”) and put it in a variable.
Make the skill assume the role we created earlier (to read our table).
Query the table on the GSI for “Product_Name” we created earlier and return the corresponding isle value.
Starting with the “HelloWorld” skill code, I changed in the “HelloWorldIntentHandler” function in order to call my renamed Intent. I simply replaced “HelloWorldIntent” with the name of my intent.
class isleFinderIntentHandler(AbstractRequestHandler):
    """Handler for Hello World Intent."""
    def can_handle(self, handler_input):
        # type: (HandlerInput) -> bool
        return ask_utils.is_intent_name("isleFinderIntent")(handler_input)
In order to perform operations on DynamoDB, I needed to import the boto3 AWS SDK for Python.
import boto3
from boto3.dynamodb.conditions import Key
Now for the meat and potatoes (pun intended)… The following code in the “Handle” function of the “HelloWorldIntentHandler” class retrieves the slot (what product the user is inquiring about) from the spoken request and sets it to a variable named “product_slot”. We’ll reference that variable later in our response:
The following code is used to assume the AWS role that will allow this program to query our DynamoDB table. I more or less copied this from this AWS knowledge base article. The only thing I had to change was the Role ARN and the region accordingly.
    # ------- Role Assumption in order to query DynamoDB Product_List table ------- #
    # 1. Assume the AWS resource role using STS AssumeRole Action
    sts_client = boto3.client('sts')
    assumed_role_object=sts_client.assume_role(RoleArn="arn:aws:iam::123456789000:role/LambdaDynamoDBReadOnly", RoleSessionName="AssumeRoleSession1")
    credentials=assumed_role_object['Credentials']

    # 2. Make a new DynamoDB instance with the assumed role credentials
    dynamodb = boto3.resource('dynamodb', aws_access_key_id=credentials['AccessKeyId'], aws_secret_access_key=credentials['SecretAccessKey'], aws_session_token=credentials['SessionToken'], region_name='us-east-1')
    # --------------- End Role Assumption --------------- #

    table = dynamodb.Table('Product_List')
Once we have the table loaded in, the remaining logic to get this working at a basic level is fairly simple.
        response = table.query(IndexName="ProductName-index",KeyConditionExpression=Key('ProductName').eq(product_slot))

        response_count = response['Count']

        # Make sure only one (1) item is returned from the DynamoDB query. Otherwise, fail.
        if (response_count == 1):
	        [result] = response['Items']
	        # If name of product (slot) does not end in "s", return "is in isle...". Else, return "are in isle..."
	        if (product_slot[len(product_slot) -1] != "s"):
	            speak_output = product_slot + " is in isle " + str(result['Isle'])
	        else:
	            speak_output = product_slot + " are in isle " + str(result['Isle'])
        else:
            speak_output = "Sorry, I don't know where that product is."
Here’s a link to the most up-to-date version of the complete lambda_function.py for this skill on GitHub Gist. This was a pretty fun project and it has me thinking about what other kinds of Skills I could create that would be useful in the real world. I look forward to publishing a skill in the future (which I’ll be sure to write another post on!).