(Semi) High-Availability WordPress Website on AWS
I’ve spun up dozens of WordPress installations over the years for everything from production e-commerce websites to simple test rigs. So far, they’ve all been simple single-server, single-disk installations. I’ve never needed to do any kind of distributed or high-availability configuration previously. While I don’t do a lot of work with web servers at the moment at my day job, I used to do web development for a building materials company with a fairly sizeable e-commerce website. Looking back, it probably would have been worth-while to configure that websites underlying architecture for higher availability than just a simple single-server configuration. With that scenario in mind, I decided to configure a simple multi-server distributed architecture in AWS for a fictitious WordPress test website for my latest project.
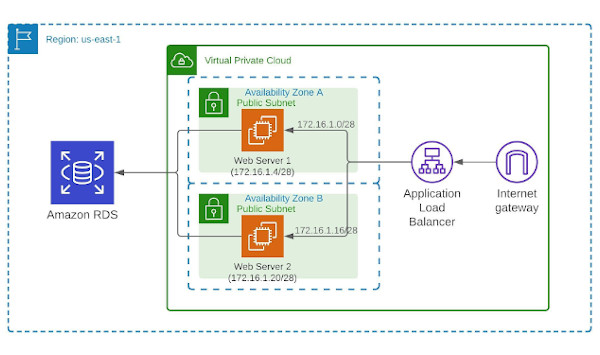
For this project, I wanted to have two WordPress web (application) servers in two different Availability Zones with a load-balancer distributing traffic between them. These web servers would contain only the core WordPress files, plugins, and themes – the media files would be hosted in an S3 bucket and the database hosted in RDS in a multi-AZ deployment. Together, this would theoretically improve performance and provide higher availability of the application. Note that there is a lot more you could do to further improve the availability and performance of this website including usage of a CDN (such as CloudFront) and auto-scaling, but I wanted to keep this project’s footprint relatively small and simple for cost reasons.
Here’s a birds-eye view of the steps I performed to complete this project:
- Create and configure the VPC for the application including subnets, security groups, Internet Gateway, etc.
- Launch and configure the initial EC2 instance (Web01) using the Bitnami WordPress AMI and assign an Elastic IP
- Create an RDS database and migrate the initial WordPress database to it from Web01
- Create an S3 bucket and IAM user for use with the Media Offload WordPress plugin
- Clone Web01 to create the second web server (Web02)
- Setup a load balancer and add both web servers as targets
- Configure DNS records
- Configure rsync on both web servers to synchronize theme and plugin changes on Web01 to Web02
While this may look involved, it really wasn’t that time consuming. Also, I won’t go deep into step 8 in this post as my previous post covers this in detail (which I’ll link to at the end). With that, let’s dive in!
Looking at the VPC diagram at the top of this post, you can see I setup two different subnets for my web servers (one in each). I also added an Internet Gateway with a default route to 0.0.0.0/0, making these subnets public. Each server then has a static, public Elastic IP address assigned to it making them accessible from the internet. Specifically, they are accessible on ports 80 and 443 as shown below in the security group I created for the web servers.
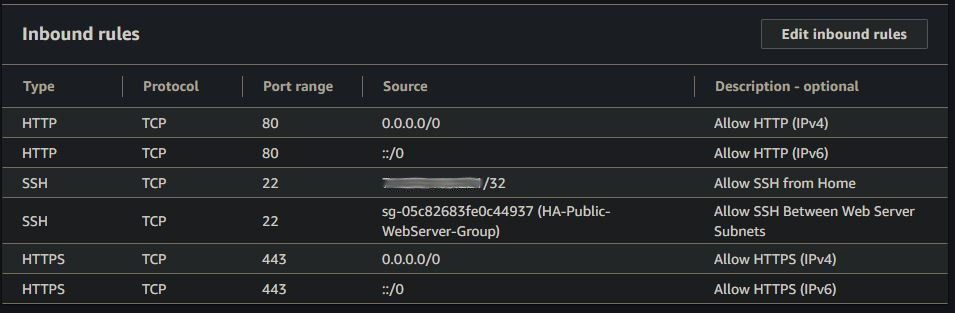
I also have port 22 open (SSH) to the public IP address of my home network for management, and to the web server security group to allow rsync between the two servers (which we’ll look at later).
Next, I launched an EC2 t2.micro instance in subnet A using Bitnami’s WordPress AMI. This AMI is composed of a Debian Linux instance with WordPress installed and the database configured. I then assigned an Elastic IP to this instance and added it to my public web server security group.
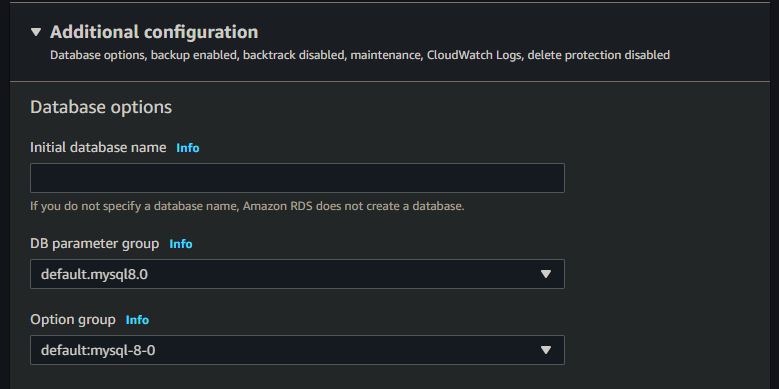
With the initial web server running, the next step was to create a MySQL database in RDS. This process is relatively straightforward, but there are a couple things you should look out for in the database creation wizard. First, if you want the benefits of increased redundancy of your database service, you should select “Multi-AZ” deployment. This will setup a standby RDS instance in another availability zone which is ready to take over should anything happen to the primary instance. Note that this will cost more money. Also, under “Additional Configuration”, be sure to enter an “Initial database name”. If you don’t do this, you won’t actually have an initial database created – you’ll have to SSH into the RDS instance and create the actual database in MySQL.
With the RDS database created, I followed this tutorial published by Bitnami to export the database created initially on Web01 to RDS. You’ll also need to modify the wp-config.php file to point to the RDS database as outlined in the tutorial.
At this point, your “Hello World” WordPress website should be functional. I also wanted to store my website media files on S3, and determined that the best option was to use the “WP Offload Media Lite” WordPress plugin to achieve this. Essentially, you create a public S3 bucket and an IAM user with access to that bucket in order to upload and retrieve files from it. You then enter that user’s access keys in the wp-config.php file so that the plugin can access the your bucket as that user. The plugin makers, Delicious Brains Inc, provide excellent documentation that will guide you through the setup details.
With my Web01 golden-server setup how I wanted it, I then went about cloning it to make Web02. To do this, I simply created an image (AMI) of Web01 and launched another EC2 instance in subnet B using that AMI. After assigning an Elastic IP address to the instance and adding it to my web server security group, I had two identical servers that were ready to be put to use behind a load balancer.
AWS provides three types of load balancers at the time of this writing – Classic, Network, and Application load balancers. As we’re creating a website that will be accessed via HTTP/HTTPS by end users, I used an application load balancer. For the load balancer configuration, I added a listener for port 443 in addition to port 80 and selected the two AZ’s that my web servers reside in to be part of the distribution. You’ll also need to specify an SSL certificate to use if you’re enabling HTTPS. I generated a free SSL certificate in AWS Certificate Manager (which AWS provides a link to in the load balancer configuration wizard). After creating the certificate, AWS provides you with an auto-generated CNAME record which you enter with your domain registrar to verify ownership of the SSL certificate. For example, this is what the CNAME record looks like for my domain name in Google DNS.

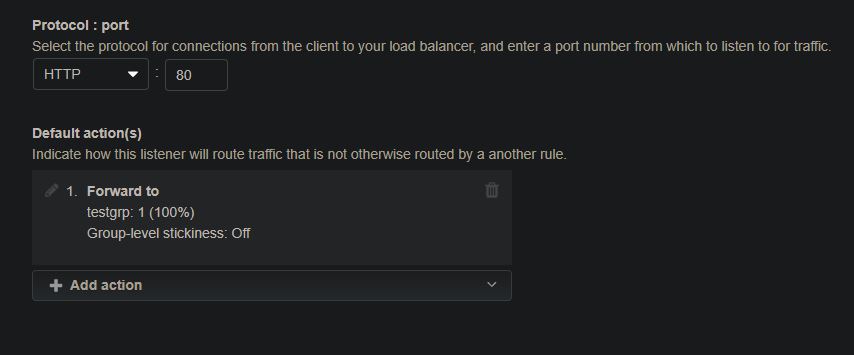
With your SSL certificate verified, the next step in the load balancer configuration is to create a Target Group and add your web servers to it. A “Target Group” is simply a group of servers which a load balancer should distribute traffic to. As such, my target group consisted of my two web servers. After creating the target group and adding the web servers, I made sure to check “sticky sessions” under “Attributes” within the console and configure a health check. “Sticky Sessions” essentially tie an end user to a specific web server within the target group for the duration of their session. I just did this for consistency. Additionally, I configured a health check on the “/wp-content” directory. This will check the availability of the website at the application layer (HTTP/S) and alert you if it is not reachable, even if the instance itself is healthy.
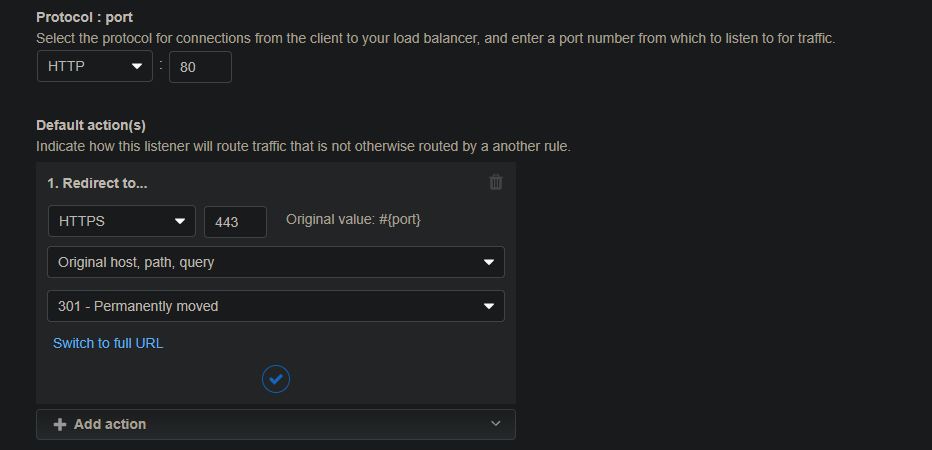
At this point, I had a load balancer created, but my traffic was not automatically redirecting to HTTPS if I entered my domain name (i.e. www.example.com) in my web browser without explicitly appending the “https://” to the beginning. To achieve this, I had to do two things. First, I had to create a subdomain forward record in Google DNS for my domain. This record tells browsers to forward “[mydomainname].com” to “https://www.[mydomainname].com”. Additionally, I had to modify the port 80 HTTP listener on my load balancer to redirect to HTTPS. To do this in the AWS console, navigate to EC2 > Load Balancers, select your load balancer, and select the “Listeners” tab. Next, check the box next to your port 80 listener and click the “Edit” button.
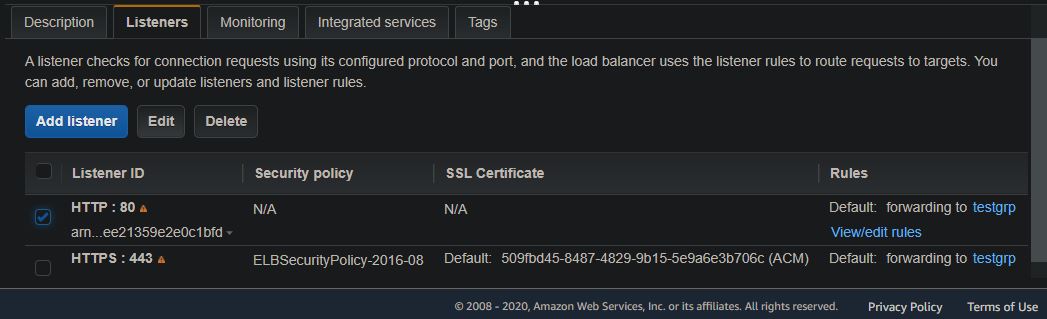
Within the port 80 listener page, I had to remove the default listener action, then create the “redirect” listener action shown below. It took me a while to figure this out but, once I did, all traffic was forced to my website over HTTPS.
With the underlying architecture in place and configured correctly, I could have ended this project here. I shut down one of the servers to confirm that the redundancy was working correctly, which it was. Any new posts or media I added to the site were displaying on both servers (I tested this by simply navigating to the public IP address of each individual server). However, I quickly realized that any theme or plugin updates would not replicate automatically between the two servers as they are not stored in the database or in S3. My previous post, seen here, explains how I solved this problem using rsync. This way, any theme or plugin updates made on my master server (Web01) would automatically replicate over to the secondary server (Web02) after 5 minutes. So far, it’s working pretty well.
This was a really fun project that used several different AWS services. I’m happy with this setup for my needs at the moment, but I know there’s several different things I could do in addition (or instead of) that would make this setup even more robust. I’d like to figure out how to periodically update my AMI so that it has the latest changes and then use it in an autoscaling setup. This way, if I make lots of changes since the original AMI and one of my servers goes down, any new server(s) won’t need to copy all changes over since the beginning – the AMI that launched it would have the latest changes. Once I figure this out I’ll do another post on it – stay tuned!