VMware Home Lab Build
Introduction
My coworkers and I are preparing to refresh the server infrastructure at the company I work for. The new infrastructure will be composed of two VMware ESXI clusters in two datacenters (one cluster in each datacenter), with two hosts per cluster. In anticipation of this, I’ve setup a home lab with the intent of improving my understanding of the VMware virtualization ecosystem before deploying to the big (expensive) hardware at work. While my home setup doesn’t have anywhere near the hardware capacity or number of features as the appliances we’ll be deploying for our company, my goal is to replicate the high-level topology of one of the datacenters and learn how to configure and manage vCenter in that context.
The Build
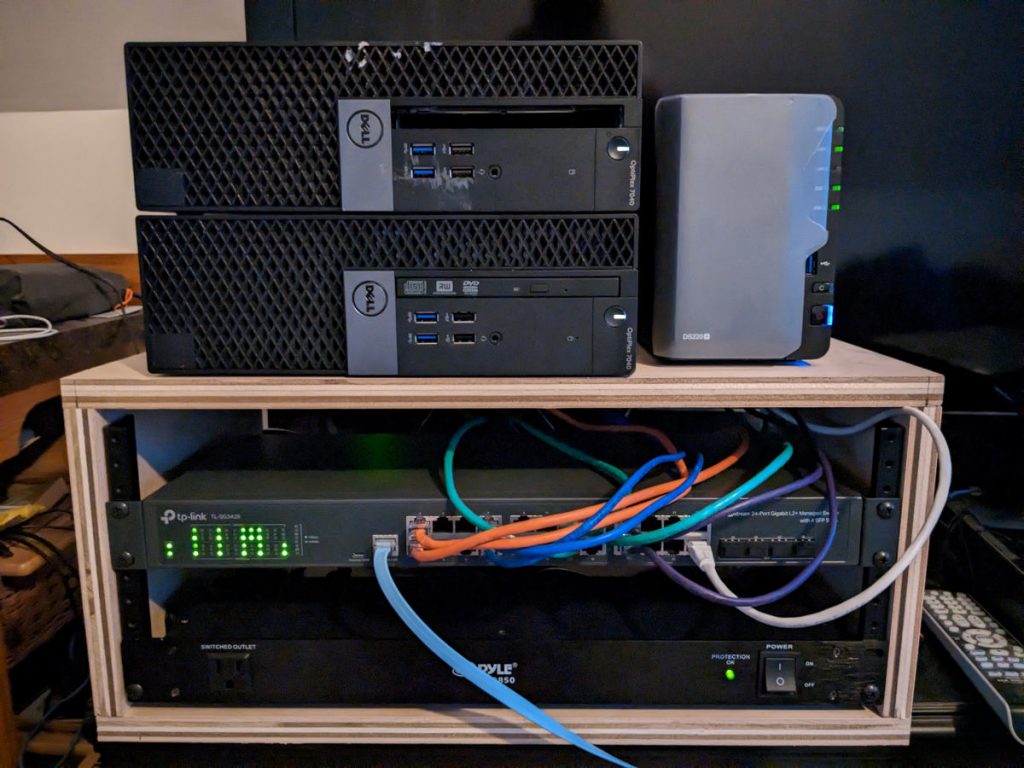
I spent a lot of time researching different hardware options that would balance cost with performance, features, expandability, and noise. My budget was $1000 (give or take a few). I ended up going with the following hardware:
- 2x Dell Optiplex 7040 SFF desktops w/ Intel i5 CPU’s and 24GB RAM ($150 ea)
- 2x PCIE 1GB 2-port NIC’s ($35 ea)
- 2x USB Ethernet Adapters ($15 ea)
- 1x Synology DS220+ (~$300 retail but I got mine for a Cyber-Monday price of $250)
- 2x 7.2k RPM 1TB HDD’s ($50 ea)
- 1x TP-Link tl-sg3428 Switch ($200)
- 1x Rack-Mount Power Supply ($50)
- 1x Home-Built Plywood Network Rack/Box (~$100)
I decided to go with the small form-factor machines rather than micro form-factor systems because of the ability to easily add NIC’s via PCIE expansion. Also, while these systems are not on VMware’s Hardware Compatability List, they do run ESXI 7.0u3 without issue (so far at least). For the switch, I was originally going to use an old HP Procurve 48G switch with some Noctua fans instead of the TP-Link, but I realized that it was pulling 50 Watts of power at idle wich equates to almost $10/mo for electricity where I live if running 24/7. The TP-Link switch uses less than 10 Watts and is quieter. At idle, the whole build only uses about 65-70 Watts and is no louder than my Precision Workstation. Finally, while I would like to go with SSD storage at some point, I decided to go with HDD’s simply because I had them and they didn’t cost me anything.
For the network configuration, each host has four network interfaces – three are standard 1Gb NIC’s plus one USB ethernet adapter. The USB ethernet adapter is used for the management network on each host as this network shouldn’t require significant bandwidth. Each of the other three NIC’s are used for the storage, vMotion, and VM traffic networks respectively (each in different vlans). While I have no NIC redundancy for any of those networks in this configuration, I plan to add another 4-port PCIE NIC in each host and configure to use two NIC’s per network. The Synology storage is exposed to via iSCSI, with both hosts connecting to the same target. With that said, I don’t have any storage redundancy – if the Synology dies my VM’s are going down.
My vCenter server is running on the dual-host cluster. Before setting up vCenter, I configured a DNS server using DNSmasq on a Debian instance on one of my ESXI hosts as hosts need to be resolvable via DNS by vCenter. I setup vCenter as a VM on that same host and then, once vCenter was up, added both hosts to a cluster in vCenter with DRS and HA enabled.
Now that I have my cluster mostly configured, it’s time to play with some of the features of vCenter. I plan to experiment with the following features and more:
- vMotion (including Storage vMotion)
- Host Configuration profiles
- DRS
- HA
- vCenter backups
- Distributed Swtiches
I’m planning to do another post or two covering some of the additional testing and configuration I’ll be doing of the next several weeks with my lab. I’m also going through some training on Pluralsight which covers a lot of the features of VMware virtualization so I’m hoping these resources will provide an effective platform on which to learn more about the technology. Stay tuned for more!